Fluorescent lights do a lot of damage to fabrics and other materials. Use ultraviolet filters (found at electrical supply stores) to decrease the damage.
Piece out,
Jess
- Posted using BlogPress from Jess' iPhone

Sunday, December 11, 2011
Tuesday, October 18, 2011
A Review on the Mystery quilt
Howdy folks,
Did you play along with the mystery with us over the weekend? If so, we would love to see your pretty top! Come over to the forum and show us.
This is a great little quilt. It will perfect for my new baby, once he/she is about toddler size. Actually, my 7 yr old could fit under it. So it will see some long usage, I am sure.
For you beginners, this is the perfect quilt to try out and practice your HST's (half square triangles) and your flying geese. You make 5 different blocks. So you get plenty of practice.
For you who have been quilting awhile, this is an easy quilt. But that does NOT mean it's boring! OH NO! There is a twist or two from your usual pattern, that makes it a fun quilt to put together.
It only takes 5 yards, 1 yard of 5 different fabrics each. So whether you like bright colors, pastels, Americano, 1930s, darks, whatever, it will be smashing in any colorway.
And just because I don't like to leave you without a picture or two....

Just a few, small sneak peeks...

Cause it's not a mystery...if you know what it looks like beforehand.
Thanks for stopping by! Come and join us on the forum.
Dorian
Monday, October 3, 2011
October mystery weekend
Hello, hello!
The Oct mystery weekend is coming!! YAH! Mark your calenders for Oct 15th &16th. You wont want to miss it. Jess has the best mysteries on the net (in my humble opinion :) LOL )
Anyways, you can order the mystery pattern here, for only $9.95. And you can buy a beautiful kit here, if you want.
You don't have to use a kit though. All you need is five fabulous fabrics that go well together, one yard of each fabric.
These are the ones I am using.

It being Fall, Jess had Fall fabrics in mind when she made this mystery....but...well, this is what I had. LOL. I like Summery fabrics more than Fall ones anyways :) I'm sure it will look beautiful though, no matter what season you use.
I hope you all come over to the forum and join in the discussion and pictures when the weekend is here. You have to be a member of our forums to join to see the mystery threads though.
But we always have lots of fun things going on. So come on down and join the fun.
Friday, September 23, 2011
Diva Designer Tip 11/23/11
When removing a bobbin (with thread still on it) from the bobbin case, clip the thread tail right next to the case and then remove the bobbin. Pulling a long thread tail through the bobbin case can mess up the spring and/or tension on your bobbin.
Piece out,
Jess
- Posted using BlogPress from Jess' iPhone
Piece out,
Jess
- Posted using BlogPress from Jess' iPhone
Tuesday, September 20, 2011
Diva Designer Tip 09/20/11
Ever have wavy borders after quilting? Check to make sure you have a consistent density of quilting over the entire quilt surface. If not, the borders (or the entire quilt) may appear wavy. Go back and add more quilting where needed and your waves should calm down a bit!
Piece out,
Jess
- Posted using BlogPress from Jess' iPhone
Piece out,
Jess
- Posted using BlogPress from Jess' iPhone
Monday, September 19, 2011
I'm still here.....
So sorry for the quiet blog lately. The last of Summer heat and being pregnant just don't combined very well :) I'm feeling good though, and am hoping to jump back into more quilting/designing and blogging.
I have several projects that I want to do. I'm working on a quilt for our Quilty Aunty's thread on the Q&N forum. We make baby quilts for members expecting a baby/grandbaby/niece/nephew.
I want to make some receiving blankets, burb cloths, and cloth diapers. Does anyone have some good tutorials/patterns for these, you would like to share?
I bought some lovely Flurry.
I'm making my Secret Santa gift from some of it.
This is the next bundle I want to get.
It's Meadow Friends, by Deb Strain. It's so cute! I think I'll make my own baby quilt from this line.
How about you? have you started on Christmas projects yet? I also tell myself I am going to start on gifts early....and I never do!
Have a great day and thanks for stopping by,
Dorian
I have several projects that I want to do. I'm working on a quilt for our Quilty Aunty's thread on the Q&N forum. We make baby quilts for members expecting a baby/grandbaby/niece/nephew.
I want to make some receiving blankets, burb cloths, and cloth diapers. Does anyone have some good tutorials/patterns for these, you would like to share?
I bought some lovely Flurry.
 |
| picture, courtesy of Lola Pink fabrics |
I'm making my Secret Santa gift from some of it.
This is the next bundle I want to get.
 |
| picture, courtesy of GreenFairy quilts |
It's Meadow Friends, by Deb Strain. It's so cute! I think I'll make my own baby quilt from this line.
How about you? have you started on Christmas projects yet? I also tell myself I am going to start on gifts early....and I never do!
Have a great day and thanks for stopping by,
Dorian
Saturday, August 27, 2011
quilt as you go...hexagon table runner
Hello everyone, I have finally got my tutorial together for my quilt as you go hexagon table runner. Whew! And I am warning you know, my quilting skills have taken a dive this past week or so :( LOL (so just ignore the quilting)
I made three more hexagon flowers out of 4" squares. And sewed them together on the sewing machine. Then I turned under the edges 1/4" and sewed it down. (If you prefer to applique, then don't sew the edges under 1/4")

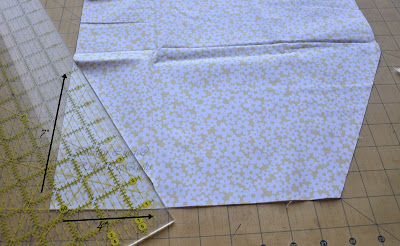
Next I cut three 14" squares. Laid my ruler on the side, 4" in on the bottom, and 7" up the side, and cut.

Turn the ruler and do the other bottom side.
Flip the whole thing, so the top is on the bottom. And cut as above.

Take four 8.5"x 9" rectangles. Lay them so that the 9" go out to the side. Lay your ruler so the edge is at the bottom left corner, and the 30 degree angle on the ruler is along the left edge of fabric. Cut.

Cut at a 30 degree angle from the bottom right corner also.

Take one triangle, lay if right sides together with a side of the hexagon. Making sure the tips of the triangle, go past the edges of the hex a little bit.

Place two triangles on another hexagon, on opposite sides of each other.

And sew the last one on the last hexagon.

Cut backing and batting at 18"x 46". Fold in half both ways, and finger press to find the middle. (you can use a ruler and pencil too, if you want)

Lay hexagon two in the very center and pin it down. (watching where you put the triangles)

Lay hexagon three on the right side, right sides together. Making sure that the tip of the triangle hangs off the edge of the bottom hexagon about 1//4". Pin and sew with a 1/4" seam.

To get those inner seams to meet just right. I fold back the top piece along the 1/4" mark, before I sew, and make sure those two seams are going to intersect on that 1/4" line. Then put a pin in it.

Open it up and place the hexagon one on the left. Right sides together. Pin and sew like before.

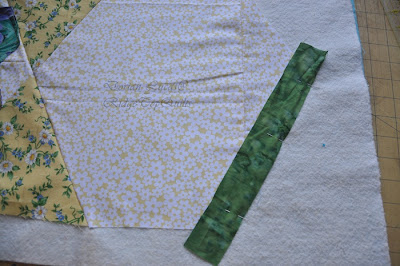
Now cut four 1.5"x 11" strips and two 1.5"x36" ( I already had these strips at 1.5", so didn't want to cut any other ones (yes, being lazy. lol) but you can easily put 2" strips on instead.)
Add the 11" long strips to the ends. Place one, right sides together, making sure they go over the ends of the hexagon. Pin and sew.
Open it up. You can iron if you want, or just finger press it. Place another on the other side, making sure that the corner goes past the green strip. Pin and sew.

Do the same thing for the other end.

Place your long strip, right sides together, making sure to go over the green end strip. Pin and sew.

Do both long sides.
Place your flowers in the center of the hexagons. Either quilt them down or applique them.

Lay your ruler along the end pieces and cut off extra batting/backing. Doing that all the way around. Cutting your ends first. Then the sides.

Quilt as much or as little as you want.
Add the binding, and your done :)

I hope you've enjoy my little tutorial.
Have a great day!
And thanks for stopping by
Dorian
I made three more hexagon flowers out of 4" squares. And sewed them together on the sewing machine. Then I turned under the edges 1/4" and sewed it down. (If you prefer to applique, then don't sew the edges under 1/4")

Next I cut three 14" squares. Laid my ruler on the side, 4" in on the bottom, and 7" up the side, and cut.

Turn the ruler and do the other bottom side.

Flip the whole thing, so the top is on the bottom. And cut as above.

Take four 8.5"x 9" rectangles. Lay them so that the 9" go out to the side. Lay your ruler so the edge is at the bottom left corner, and the 30 degree angle on the ruler is along the left edge of fabric. Cut.

Cut at a 30 degree angle from the bottom right corner also.

Take one triangle, lay if right sides together with a side of the hexagon. Making sure the tips of the triangle, go past the edges of the hex a little bit.

Place two triangles on another hexagon, on opposite sides of each other.

And sew the last one on the last hexagon.

Cut backing and batting at 18"x 46". Fold in half both ways, and finger press to find the middle. (you can use a ruler and pencil too, if you want)

Lay hexagon two in the very center and pin it down. (watching where you put the triangles)

Lay hexagon three on the right side, right sides together. Making sure that the tip of the triangle hangs off the edge of the bottom hexagon about 1//4". Pin and sew with a 1/4" seam.

To get those inner seams to meet just right. I fold back the top piece along the 1/4" mark, before I sew, and make sure those two seams are going to intersect on that 1/4" line. Then put a pin in it.

Open it up and place the hexagon one on the left. Right sides together. Pin and sew like before.

Now cut four 1.5"x 11" strips and two 1.5"x36" ( I already had these strips at 1.5", so didn't want to cut any other ones (yes, being lazy. lol) but you can easily put 2" strips on instead.)
Add the 11" long strips to the ends. Place one, right sides together, making sure they go over the ends of the hexagon. Pin and sew.

Open it up. You can iron if you want, or just finger press it. Place another on the other side, making sure that the corner goes past the green strip. Pin and sew.

Do the same thing for the other end.

Place your long strip, right sides together, making sure to go over the green end strip. Pin and sew.

Do both long sides.
Place your flowers in the center of the hexagons. Either quilt them down or applique them.

Lay your ruler along the end pieces and cut off extra batting/backing. Doing that all the way around. Cutting your ends first. Then the sides.

Quilt as much or as little as you want.
Add the binding, and your done :)

I hope you've enjoy my little tutorial.
Have a great day!
And thanks for stopping by
Dorian
Thursday, August 25, 2011
08/25/11 Diva Designer Tip
If your tension seems off on your machine, try replacing the needle first. Sometimes a fresh needle can fix the problem.
Piece out,
Jess
- Posted using BlogPress from Jess' iPhone
Piece out,
Jess
- Posted using BlogPress from Jess' iPhone
Tuesday, August 23, 2011
A lazy blogger...
Gosh, sorry it's been awhile since I made a post! What a lazy blogger I am being lately. There is lots going on in my little world, and it's kind of pushed quilting and blogging to the back.
I'm sorry if there is anyone out there waiting for my hexagon quilt as you go table runner. You all are so quiet, I have no idea if anyone is waiting for the tutorial or not :)
But, none the less, I will try to get that done in the next few days for whomever is interested.
I have finished the baby quilt top I am making. I don't want to post a full picture, as my friend wants to be surprised by it, and she reads this blog. But, I can tell you you can go here (scroll down) to see it!
And because I don't like to post without a picture, here is a little snippet...the monkey 'tail' (wrench) block that I made.

Don't you just love those polk a dots??!! I do. lol
Have a great day all. Thanks for dropping by!
Tuesday, August 16, 2011
Diva Designer Tip 8/16/11
Use a pants hanger to hold open your pattern book while working on a quilt. You can even hang it on a convenient wall or bulletin board to save space!
Piece out,
Jess
- Posted using BlogPress from Jess' iPhone
Piece out,
Jess
- Posted using BlogPress from Jess' iPhone
Monday, August 15, 2011
Diva Designer Tip 8/15/2011
Always "set" your seam first, by pressing it the way it was sewn before pressing the seam one direction or the other. This sinks the thread into the fabric and reduces the bulk of the seam (which is really nice when quilting!).
- Posted using BlogPress from Jess' iPhone
- Posted using BlogPress from Jess' iPhone
Thursday, August 11, 2011
What I'm doing...
So Summer is coming to a close....at least, by the school calendar it is. So much of the states are broiling, that it's hard to tell. LOL.
Whether you home school like I do, or your kids are in public or private school. Now is the time everyone is getting ready to get back into the routine. Does that mean less sewing time for you? Or more?
For me, I have to juggle the schooling of the kids. So I actually get less time to sew in the Winter months. But as it's so important to give yourself some "ME" time, I make sure I take some sewing time most days.
I finally got these gorgeous Anne Kellie fabrics, and some solids to go with them. This is going to be a baby quilt for my best friends first Grandchild. I got this fabric from Lola Pink. I highly suggest this fabric store. Fast, curtious service! And great prices.

These are SO CUTE! I can't wait to cut into them. The first block I will be doing is the monkey wrench (I think a better name would be monkey TAIL. LOL)...of course! The nursery is going to be decked out in jungle fun, so a monkey quilt fits the bill.

Now I know, most people will say "what a minute, that is snails trail, not monkey wrench". I saw this block here, and that is what she calls it.
Here is a snails trail block. That I got here.

Can you see the subtle difference?
The snails trail block consists of a 4-patch, with THREE layers of squares after it. Whereas the monkey wrench consists of a 4-patch, with FOUR layers of squares after it. Pretty neat, huh?!
So, I am going with this monkey wrench, not the other monkey wrench pattern out there.
I also have some batting, so am going to be doing my hexagon quilt-as-you-go table runner next week. Has any else done some of these hexagon place mats?

I also have all three of my quilt along blocks done. I'm doing this quilt along over at RidgeTopQuilts. You're welcome to come over and do it too. We'll be putting this blocks together next week.

Not to mention the rows for our row robin swap I'm doing on the forum. And getting ready to quilt my first Aunty quilt.
So it looks like I have plenty to keep me busy....how about you? What are you working on?
Have a great day, thanks for stopping by!
Dorian
Monday, August 8, 2011
Diva Designer Tip
Instead of marking the line to sew on the backs of tons of squares, try using wide sticky notes as a sewing guide. I used the same two sticky notes to sew over 300 seams and saved a chunk of time!

- Posted using BlogPress from Jess' iPhone

- Posted using BlogPress from Jess' iPhone
A quick note
Hello out there,
Just a quick note to tell you that all our Diva Designer tips our on their own page now. up top, alongside Tutorials and such.
Here's one from me, although I don't know how much of a tip it is...it's probably just common sense, but sometimes...I just don't seem to have any! LOL
When drafting and making your own patterns. Cut out and sew a sample block from scrap fabric, BEFORE you cut out all the pieces for all the blocks you are going to do!

Sigh, pattern making is not fun all the time!....
Just most of it. lol
Have a great day,
Thanks for stopping by
Dorian
Sunday, August 7, 2011
Diva Designer Tip
Quilters used to use cooking ingredients like cocoa powder, cinnamon, baking powder, and corn starch to pounce mark their quilts for quilting. In a pinch, out if chalk? You might have something in your pantry that will do! (Be sure to test it on a scrap of fabric first, as you would do with anything you put on a quilt to mark it.)
- Posted using BlogPress from Jess' iPhone
- Posted using BlogPress from Jess' iPhone
Thursday, August 4, 2011
Diva Designer Tip
When working with fusible appliqué, use parchment paper to protect your ironing board cover and other surfaces from the fusible product you choose to use. (I like Steam-a-seam and sometimes Misty Fuse, and I try to cut out the center of the fusible and only fuse the edges of the pieces for a softer end product.)
- Posted using BlogPress from Jess' iPhone
- Posted using BlogPress from Jess' iPhone
Wednesday, August 3, 2011
The small clutch, handbag, make-up bag.......
It comes with all kinds of names, depending on what you do with it I suppose :)
Have a few leftover charms from a charm pack? Or some 5" squares that are in the scrap bin?

Here's a cute little bag to make with them.

You will need:
6 charm squares (or 5" squares)
two- 7 1/4"x 12 1/4" rectangles for lining.
four - 2.5" x 12.5" contrasting strips
a 12" zipper
a 2.5"x 15" strip for a strap
two- 7 1/4" x 12 1/4" rectangles of batting or interfacing.
Fold your strap in half lengthwise, unfold it and fold each long side into the middle. Then fold in half again and sew a seam all the way down the length.
Iron on your interfacing to the lining rectangles, if using.
Take your charm squares (5"squares) and pair them up, right sides together. Draw a line from one corner to the other.

Sew a 1/4" seam on both sides of the line, on all three squares. Cut apart on the drawn line, making 12 HST blocks.

Trim your HST's to 4.5".
Put three of them in a line, in a pleasing manner. Sew them together. Making two sets of three blocks.

Add a contrasting 2.5"x12.5" strips along the top and bottom of each set.

Lay one lining piece right sides down, put batting on (if using), then your front piece, right side up. You can put a few pins in to keep everything together.
Put your zipper right side down on top of the front piece and sew on. Open and make a top seam. On top of the zipper, lay your next front piece, right side down. Put on your batting, if using, then the lining piece, right side up. Sew the sandwhich to the zipper. Open and top stitch.

UNZIP your zipper half way. Fold your strap in half, so it makes a loop. Stick the raw ends of it along the side, about an inch down from the top. (Obviously, I forgot to do this before I sewed my bag together!!)

Fold one side over, so both front sides are facing each other. Sew a seam down one side, across the bottom and up the other side. Taking some back stitches at start and stop. I like to use a 3/8" or 1/2" seam on my bags. Gives them a tiny bit extra stength.
Trim your corners.

If you don't like the raw edge on the inside of your bag. You can put a binding on them now. Or instead, you can make a french seam (which you would do instead of this sewing and trimming). Whip Up has a drawstring bag tutorial, showing how to make a french seam.
Turn right side out. Carefully poking out the corners.
Hope you enjoyed my quick, easy tutorial. This is a perfect little bag for a quick trip to the store, a night on the town, or to use as a make-up bag.
Have fun! And feel free to email/comment if you have any questions.
Thanks for stopping by!
Dorian
Have a few leftover charms from a charm pack? Or some 5" squares that are in the scrap bin?

Here's a cute little bag to make with them.

You will need:
6 charm squares (or 5" squares)
two- 7 1/4"x 12 1/4" rectangles for lining.
four - 2.5" x 12.5" contrasting strips
a 12" zipper
a 2.5"x 15" strip for a strap
two- 7 1/4" x 12 1/4" rectangles of batting or interfacing.
Fold your strap in half lengthwise, unfold it and fold each long side into the middle. Then fold in half again and sew a seam all the way down the length.
Iron on your interfacing to the lining rectangles, if using.
Take your charm squares (5"squares) and pair them up, right sides together. Draw a line from one corner to the other.

Sew a 1/4" seam on both sides of the line, on all three squares. Cut apart on the drawn line, making 12 HST blocks.

Trim your HST's to 4.5".
Put three of them in a line, in a pleasing manner. Sew them together. Making two sets of three blocks.

Add a contrasting 2.5"x12.5" strips along the top and bottom of each set.

Lay one lining piece right sides down, put batting on (if using), then your front piece, right side up. You can put a few pins in to keep everything together.
Put your zipper right side down on top of the front piece and sew on. Open and make a top seam. On top of the zipper, lay your next front piece, right side down. Put on your batting, if using, then the lining piece, right side up. Sew the sandwhich to the zipper. Open and top stitch.

UNZIP your zipper half way. Fold your strap in half, so it makes a loop. Stick the raw ends of it along the side, about an inch down from the top. (Obviously, I forgot to do this before I sewed my bag together!!)

Fold one side over, so both front sides are facing each other. Sew a seam down one side, across the bottom and up the other side. Taking some back stitches at start and stop. I like to use a 3/8" or 1/2" seam on my bags. Gives them a tiny bit extra stength.
Trim your corners.

Turn right side out. Carefully poking out the corners.
Hope you enjoyed my quick, easy tutorial. This is a perfect little bag for a quick trip to the store, a night on the town, or to use as a make-up bag.
Have fun! And feel free to email/comment if you have any questions.
Thanks for stopping by!
Dorian
Monday, August 1, 2011
Diva Designer Tip 8/1/11
When cutting triangles, patterns may have you cut some squares once diagonally and some squares on both diagonals. Do you know why? It depends on where the triangle is going to land in the project; the designer is trying to make the straight of grain land on the outside of the block or quilt top.
- Posted using BlogPress from Jess' iPhone
- Posted using BlogPress from Jess' iPhone
Saturday, July 30, 2011
Diva Designer Tip 7/30/11
Most of us know not to store our rotary mats in direct sunlight, since it will warp them. Also, store them flat (not on end), or you may warp them anyway. Same rules apply to rulers, since they will also warp and distort.
- Posted using BlogPress from Jess' iPhone
- Posted using BlogPress from Jess' iPhone
Friday, July 29, 2011
Diva Designer Tip 7/28/11
To avoid the dreaded 'v' syndrome when cutting strips, make sure the fold on your fabric is straight and perpendicular (at a 90 degree angle) to the lines you are cutting.
Piece out,
Jess
Piece out,
Jess
Location:Home
Thursday, July 28, 2011
Diva Designer Tip 7/28/11
Don't have wall space for a design wall? Tape batting and/or flannel to the back of a door for a makeshift small design wall. You'll be surprised how handy even a small design wall can be!
- Posted using BlogPress from Jess' iPhone
- Posted using BlogPress from Jess' iPhone
Location:Home
Wednesday, July 27, 2011
7/27/11 Diva Designer Tip
When cutting out pieces of fabric for a quilt, use the lines on your ruler, rather than the lines on your cutting mat, to measure. The lines on your cutting mat can become distorted over time and sometimes they aren't accurate to begin with. Piece Out, Jess
- Posted using BlogPress from Jess' iPhone
- Posted using BlogPress from Jess' iPhone
Location:Home
Tuesday, July 26, 2011
Happenings on the forum
Howdy folks,
Great tips of the day, thanks Jess!
We are having lots of fun this Summer on the form. Swaps and challenges, baby quilts and ones for soldiers.
Another mug rug swap. Here is the one I got from my friend Bobby in Australia. She sent a lot of little goodies too.

I can't show you the one I made just yet.
We are also having a "it's too pretty to cut" challenge. Here is my pretty. The pretty fabric I had to use is the white with blue butterflies.

And, we've started our annual Secret Santa gift too. Click here if you want to join in the fun (you need to join the Q&N forum too, please). This is one of the funniest! We all give our names and info to the hostess. She picks a secret friend for us. And we make a gift for our friend. Who wont know who her Secret Santa is, until late Nov/early Dec.
And, of course, this weekend is the mystery quilt weekend. And it's ALWAYS fabulous!! Jess makes awesome patterns.
Here is the fabric that I am using.

Jess made this pattern around some lovely fabric by Patti Fried, called Capri.

Jess is sold out of kits. But you can still order your pattern and choose your own fabrics.
Well, that's enough going on, yes? OH, on top of that, I am running my very first quilt a long on my blog :) would love for you to come and join me. It's a Lone star wall quilt design.
Have a great day! And thanks for stopping by,
Dorian
Great tips of the day, thanks Jess!
We are having lots of fun this Summer on the form. Swaps and challenges, baby quilts and ones for soldiers.
Another mug rug swap. Here is the one I got from my friend Bobby in Australia. She sent a lot of little goodies too.

I can't show you the one I made just yet.
We are also having a "it's too pretty to cut" challenge. Here is my pretty. The pretty fabric I had to use is the white with blue butterflies.

And, we've started our annual Secret Santa gift too. Click here if you want to join in the fun (you need to join the Q&N forum too, please). This is one of the funniest! We all give our names and info to the hostess. She picks a secret friend for us. And we make a gift for our friend. Who wont know who her Secret Santa is, until late Nov/early Dec.
And, of course, this weekend is the mystery quilt weekend. And it's ALWAYS fabulous!! Jess makes awesome patterns.
Here is the fabric that I am using.

Jess made this pattern around some lovely fabric by Patti Fried, called Capri.
Jess is sold out of kits. But you can still order your pattern and choose your own fabrics.
Well, that's enough going on, yes? OH, on top of that, I am running my very first quilt a long on my blog :) would love for you to come and join me. It's a Lone star wall quilt design.
Have a great day! And thanks for stopping by,
Dorian
7/26/11 Tip of the Day
You know that sliver of bar soap that's always left at the end? You can use the edge of it to mark your quilts for quilting.
What do you generally use to mark your quilts?
What do you generally use to mark your quilts?
Location:Home
Monday, July 25, 2011
Quilting Tip 07/25/11
Tip of the day: Some folks like to put their ironing board next to their sewing table, low enough to iron while sitting, so they can sew and iron without ever standing up. However, I like to get up and walk to my ironing board and give my muscles a good stretch every now and then. Ultimately I can sew longer and get more done if I keep myself moving. Where is your ironing board?
:-) Piece Out, Jess
- Posted using BlogPress from Jess' iPhone
:-) Piece Out, Jess
- Posted using BlogPress from Jess' iPhone
Location:Home
Wednesday, July 20, 2011
Another fabric swap top....and Summer mystery
Last Summer the Gals and I traded 10" squares of beach themed fabric. It's a lot of fun swapping fabrics. We haven't done it in awhile....Hmm, I think it's time to do it again! It's fun way to get new fabric.
I had cut and put together some HST blocks, big ones. And had a design made out. I cut some other triangles too, from different fabric. Then I stuck it all in a box and forgot about it.
SO, I finally got it out, couldnt' remember what design I was going to put these in, and couldn't find my pattern anywhere (I have quite a few notebooks with instructions/designs laying all over the place. LOL).
So I just stuck them together like this.

The prints were way too cute to cut up very much.

I love the children playing...

The wind was having fun with my quilt, while I was trying to take pictures.

This makes quilt top number 25!! That I need to quilt!!! And I am going to make another quilt real soon...lol, or quilt top I should say!
As the mystery quilt weekend is coming up soon!
The mystery is scheduled for July 30th and 31st. You still have time to order a pattern or a kit.
So tell me, how many quilt tops do you have to quilt? or are you good about quilting them right away, and they aren't piling up...like mine...LOL
Thanks for stopping by!
Dorian
Subscribe to:
Posts (Atom)