When removing a bobbin (with thread still on it) from the bobbin case, clip the thread tail right next to the case and then remove the bobbin. Pulling a long thread tail through the bobbin case can mess up the spring and/or tension on your bobbin.
Piece out,
Jess
- Posted using BlogPress from Jess' iPhone

Friday, September 23, 2011


Tuesday, September 20, 2011
Diva Designer Tip 09/20/11
Ever have wavy borders after quilting? Check to make sure you have a consistent density of quilting over the entire quilt surface. If not, the borders (or the entire quilt) may appear wavy. Go back and add more quilting where needed and your waves should calm down a bit!
Piece out,
Jess
- Posted using BlogPress from Jess' iPhone
Piece out,
Jess
- Posted using BlogPress from Jess' iPhone
Monday, September 19, 2011
I'm still here.....
So sorry for the quiet blog lately. The last of Summer heat and being pregnant just don't combined very well :) I'm feeling good though, and am hoping to jump back into more quilting/designing and blogging.
I have several projects that I want to do. I'm working on a quilt for our Quilty Aunty's thread on the Q&N forum. We make baby quilts for members expecting a baby/grandbaby/niece/nephew.
I want to make some receiving blankets, burb cloths, and cloth diapers. Does anyone have some good tutorials/patterns for these, you would like to share?
I bought some lovely Flurry.
I'm making my Secret Santa gift from some of it.
This is the next bundle I want to get.
It's Meadow Friends, by Deb Strain. It's so cute! I think I'll make my own baby quilt from this line.
How about you? have you started on Christmas projects yet? I also tell myself I am going to start on gifts early....and I never do!
Have a great day and thanks for stopping by,
Dorian
I have several projects that I want to do. I'm working on a quilt for our Quilty Aunty's thread on the Q&N forum. We make baby quilts for members expecting a baby/grandbaby/niece/nephew.
I want to make some receiving blankets, burb cloths, and cloth diapers. Does anyone have some good tutorials/patterns for these, you would like to share?
I bought some lovely Flurry.
 |
| picture, courtesy of Lola Pink fabrics |
I'm making my Secret Santa gift from some of it.
This is the next bundle I want to get.
 |
| picture, courtesy of GreenFairy quilts |
It's Meadow Friends, by Deb Strain. It's so cute! I think I'll make my own baby quilt from this line.
How about you? have you started on Christmas projects yet? I also tell myself I am going to start on gifts early....and I never do!
Have a great day and thanks for stopping by,
Dorian
Saturday, August 27, 2011
quilt as you go...hexagon table runner
Hello everyone, I have finally got my tutorial together for my quilt as you go hexagon table runner. Whew! And I am warning you know, my quilting skills have taken a dive this past week or so :( LOL (so just ignore the quilting)
I made three more hexagon flowers out of 4" squares. And sewed them together on the sewing machine. Then I turned under the edges 1/4" and sewed it down. (If you prefer to applique, then don't sew the edges under 1/4")

Next I cut three 14" squares. Laid my ruler on the side, 4" in on the bottom, and 7" up the side, and cut.

Turn the ruler and do the other bottom side.
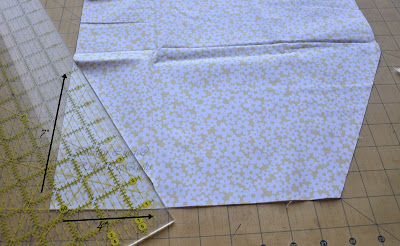
Flip the whole thing, so the top is on the bottom. And cut as above.

Take four 8.5"x 9" rectangles. Lay them so that the 9" go out to the side. Lay your ruler so the edge is at the bottom left corner, and the 30 degree angle on the ruler is along the left edge of fabric. Cut.

Cut at a 30 degree angle from the bottom right corner also.

Take one triangle, lay if right sides together with a side of the hexagon. Making sure the tips of the triangle, go past the edges of the hex a little bit.

Place two triangles on another hexagon, on opposite sides of each other.

And sew the last one on the last hexagon.

Cut backing and batting at 18"x 46". Fold in half both ways, and finger press to find the middle. (you can use a ruler and pencil too, if you want)

Lay hexagon two in the very center and pin it down. (watching where you put the triangles)

Lay hexagon three on the right side, right sides together. Making sure that the tip of the triangle hangs off the edge of the bottom hexagon about 1//4". Pin and sew with a 1/4" seam.

To get those inner seams to meet just right. I fold back the top piece along the 1/4" mark, before I sew, and make sure those two seams are going to intersect on that 1/4" line. Then put a pin in it.

Open it up and place the hexagon one on the left. Right sides together. Pin and sew like before.

Now cut four 1.5"x 11" strips and two 1.5"x36" ( I already had these strips at 1.5", so didn't want to cut any other ones (yes, being lazy. lol) but you can easily put 2" strips on instead.)
Add the 11" long strips to the ends. Place one, right sides together, making sure they go over the ends of the hexagon. Pin and sew.
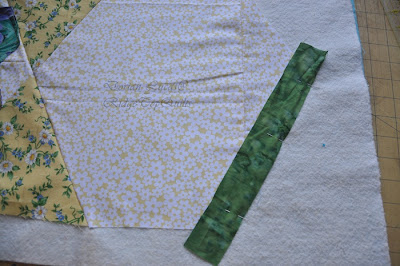
Open it up. You can iron if you want, or just finger press it. Place another on the other side, making sure that the corner goes past the green strip. Pin and sew.

Do the same thing for the other end.

Place your long strip, right sides together, making sure to go over the green end strip. Pin and sew.

Do both long sides.
Place your flowers in the center of the hexagons. Either quilt them down or applique them.

Lay your ruler along the end pieces and cut off extra batting/backing. Doing that all the way around. Cutting your ends first. Then the sides.

Quilt as much or as little as you want.
Add the binding, and your done :)

I hope you've enjoy my little tutorial.
Have a great day!
And thanks for stopping by
Dorian
I made three more hexagon flowers out of 4" squares. And sewed them together on the sewing machine. Then I turned under the edges 1/4" and sewed it down. (If you prefer to applique, then don't sew the edges under 1/4")

Next I cut three 14" squares. Laid my ruler on the side, 4" in on the bottom, and 7" up the side, and cut.

Turn the ruler and do the other bottom side.

Flip the whole thing, so the top is on the bottom. And cut as above.

Take four 8.5"x 9" rectangles. Lay them so that the 9" go out to the side. Lay your ruler so the edge is at the bottom left corner, and the 30 degree angle on the ruler is along the left edge of fabric. Cut.

Cut at a 30 degree angle from the bottom right corner also.

Take one triangle, lay if right sides together with a side of the hexagon. Making sure the tips of the triangle, go past the edges of the hex a little bit.

Place two triangles on another hexagon, on opposite sides of each other.

And sew the last one on the last hexagon.

Cut backing and batting at 18"x 46". Fold in half both ways, and finger press to find the middle. (you can use a ruler and pencil too, if you want)

Lay hexagon two in the very center and pin it down. (watching where you put the triangles)

Lay hexagon three on the right side, right sides together. Making sure that the tip of the triangle hangs off the edge of the bottom hexagon about 1//4". Pin and sew with a 1/4" seam.

To get those inner seams to meet just right. I fold back the top piece along the 1/4" mark, before I sew, and make sure those two seams are going to intersect on that 1/4" line. Then put a pin in it.

Open it up and place the hexagon one on the left. Right sides together. Pin and sew like before.

Now cut four 1.5"x 11" strips and two 1.5"x36" ( I already had these strips at 1.5", so didn't want to cut any other ones (yes, being lazy. lol) but you can easily put 2" strips on instead.)
Add the 11" long strips to the ends. Place one, right sides together, making sure they go over the ends of the hexagon. Pin and sew.

Open it up. You can iron if you want, or just finger press it. Place another on the other side, making sure that the corner goes past the green strip. Pin and sew.

Do the same thing for the other end.

Place your long strip, right sides together, making sure to go over the green end strip. Pin and sew.

Do both long sides.
Place your flowers in the center of the hexagons. Either quilt them down or applique them.

Lay your ruler along the end pieces and cut off extra batting/backing. Doing that all the way around. Cutting your ends first. Then the sides.

Quilt as much or as little as you want.
Add the binding, and your done :)

I hope you've enjoy my little tutorial.
Have a great day!
And thanks for stopping by
Dorian
Thursday, August 25, 2011
08/25/11 Diva Designer Tip
If your tension seems off on your machine, try replacing the needle first. Sometimes a fresh needle can fix the problem.
Piece out,
Jess
- Posted using BlogPress from Jess' iPhone
Piece out,
Jess
- Posted using BlogPress from Jess' iPhone
Subscribe to:
Posts (Atom)