Saturday, June 4, 2011

Summer place mats

Place mats are fun to make. You can take almost any block you like, add a bit to it, and make a place mat out of it. And quilting them as you go, just makes it quicker.


I start out with pencil and paper. Here is about how big I want my middle square.


Then I mark my block out (you would think, us being a home schooling family, that I could find an eraser in this house!! LOL)
 I wanted to use the last of my Nicey Jane, showing off the print. But I didn't measure how much of it I had left, so ended up making mine just a little smaller than what the block up above shows.


  Pieces all cut and ready to sew.


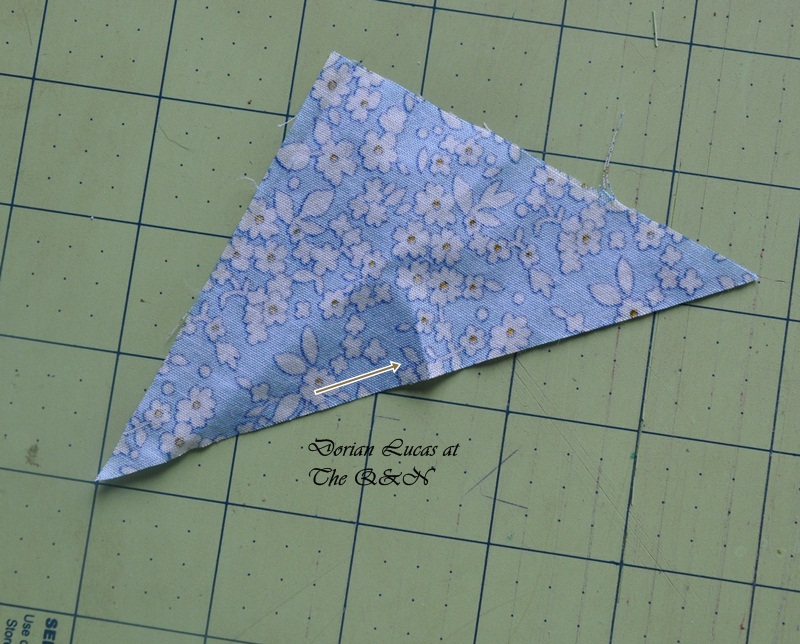
If you're quilting as you go, you want to make the smaller pieces into bigger ones. Ones that make up rows or columns, or in this case, triangles.


Figure out the rest of the place mat.


Then cut your backing and batting. I like to cut mine about an inch or so larger than what the finished front piece will be. A note here about batting. This is a great time to use those small pieces, just whip stitch them together (or use zigzag on your machine) and cut to the right dimensions.


Layer your batting and backing out (backing, right side DOWN) and smooth it. Then you want to  mark the center.

And place your middle piece evenly. Pinning it down. I also like to pin the batting to the backing in a few places (taking them out when I lay pieces down if need be).


I marked the center of all the sides on the square. Then laid my first piece down, pinning the middle of it to the middle of the square. (I am not much of a pinner, but when you quilt as you go especially, pinning helps keep things in place. As you can't do a lot of fudging to make sure things line up right.)


Go around your square, pinning and sewing with a 1/4" seam.


Make sure the pieces you have sewn first, get opened up so that the next pieces are laid on properly.


And now you can iron these flat too. It's important to get your sizes just right, as it's much harder to trim this way.


 You can use a small pair of scissor's to cut the dog ears.


Add your sides, pinning really helps with the longer pieces. You can use your scissors to cut off the yellow ends there. But I do it after the top and bottom piece are put on, so that it's more accurate.


Add top and bottom.


Add the next two pieces. Now do you see why I say to make your backing and batting a bit bigger than you need? It's easy to trim this up.


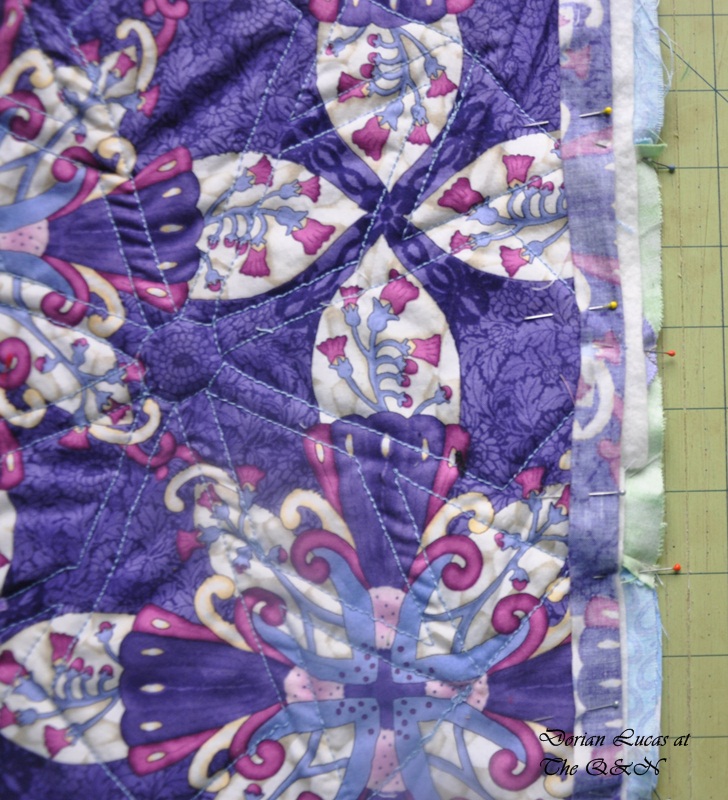
And then add your binding. Can you believe, I forgot to take a picture of it all trimmed and pretty??! LOL. I'll do that when the sun comes up and post it.

Hope you've enjoy my little Summer mat. This is a  nice way to use up the last of your little pretty.

Have a great day, thanks for stopping by.

Dorian
©Copyright D. Lucas, 2011 This is my tutorial. You are welcome to use any of my tutorials for personal use. You are not permitted to use my pictures or my words without linking back to the original and giving me credit for them.

Friday, May 27, 2011

A challenge...and a Mystery...

If you aren't a member of the forum, then you wont know what fun we are having! LOL. I have started a fun challenge. It's called "It's too pretty to cut!" challenge and you can read all about it here.

Basically, you find a pretty FQ or larger piece of fabric in your stash (or heck, go buy one!). You take a picture of it and post it on the thread. Then, you make something fantastic out of it. Your finished project picture is due by July 31st. And then the pieces will be judged. The WINNER get a $50 gift certificate to Jess's store, and the runner up gets a $25 gc to her store!! WOW, what generous gifts.

So hop on over to the forum and join in the fun.

And that's not all! Jess has the BEST quilt mystery's. She does them 4 times a year, and June is our next weekend. You sign-up, buy the pattern for only $9.95 each (or subscribe for the year, get all 4 mystery patterns for only $34.95).

Here's one of the mystery quilts that I made in 2009. 


It's an awesome weekend to have the mystery quilt going on too! June 25th and 26th......my birthday


We are always having fun, what between mystery quilt weekends...we have challenges, swaps, make charity quilts and baby quilts for members.

Hope you can join us :)

Thanks for stopping by

Dorian

Tuesday, May 24, 2011

Square in square

Hello Blogland, and my new followers! So glad to have you with us. If you aren't a member of the Q&N forum, come on over and join the fun!

Do you have trouble with making square in square blocks? They can be a little tricky, getting the triangles just right on the square. So I have a few tips to help you out.

The first thing to do is figure out how big your inner square and triangles need to be. Correction: I find that if I make my inner squares 1 3/4" smaller than you want your finished block to be, then they come out right. So they will be the same size on the diagonal, as the finished block. (I'm so sorry about this mistake!! New meds for my fibro...enough said.) EX: if you want your finished block to be 6", then the inner square needs to be 6" on the diagonal.


And to find out how big I need the triangles, I first put my inner square on point. Making sure the points are on lines. I put my ruler on the top point, and measure from there to the side point. And then add 1/4" for the seam allowance. So in this case, I need my triangles to be 3 3/4".I usually add another 1/8" to a 1/4" for some wiggle room.


There is mathmatic formulas, for figuring this out. But I can never remember them :)

Cut out squares the size you need. Then cut in half once diagonally. 


You'll need two squares per inner square.

Here is an easy way to get that setting triangle just right. You want it centered on the inner square. So I fold the inner square in half, and just give it a little pinch at the top, where the triangle is going to go. (Ignore the flour on my thumb, I was also making bread. LOL)


The pinch just leaves a little fold mark, which quickly goes away.


Do the same thing for your setting triangle. Pinch.


Right sides together, match pinch marks and then pin.


Sew at a 1/4". Your 'dog ears' should stick out  a scant 1/4".


Now just trim.


So my tips are:

Tip 1: cut your setting triangle 1/8" to 1/4" bigger than you need.

Tip 2: Fold pieces in half and pinch to find the middle.

I hope this helps any of you having problems getting that 1/4" seam on your Square in square blocks.

I am making a new scrappy quilt with this. Called butterfly wings. Here's a picture. 


Just a starting. But it's what I'm working on now. You can see more pictures/etc on it on my blog, RidgeTopQuilts.
Thanks for stopping by! Have a great day.

Dorian
Copyright D. Lucas, 2011 This is my tutorial. You are welcome to use any of my tutorials for personal use. You are not permitted to use my pictures or my words without linking back to the original and giving me credit for them.

Monday, May 16, 2011

Quilt as you go....quilt

So we've given you a few great quilt-as-you-go table runners and place mats. But what about if you want to quilt a small to large quilt, in this manner? How do you do that?

When I first learned to quilt, about 17 yrs ago now, I read all the books I could get my hands on. And some of them were books by Georgia Bonesteel. Who taught me how to quilt-as-you-go....something that I have done very little of. LOL

But anyways, here is the gist of it. It's easy and a GREAT project for practicing machine quilting (which I need a lot of!)

First thing to do is make your blocks. All of them. I made 4, just to show you the technique. Cut out squares from your backing material that is just a bit larger than your blocks, maybe an inch (which I failed to do, so things were tight later on). Cut your batting pieces about 1/2" smaller than your blocks. So you will have squares of backing and batting, enough for as many blocks as you make.

Layer them in the normal way, and pin.


Then quilt each of your blocks individually. And trim your backing to the size of the front.


Now take two blocks, put them right sides together. Pin the backing fabric away from the edge where you are going to sew. 

Now pin the edge of the top pieces together, and sew a 1/4" seam.


Here is the front and back.


Keep adding blocks to make the rows as long as you need them.
Then take one row, and lay if face up and another row and lay it face down on top. Pin your backing out of the way, match your seams up, and pin and sew top of the rows together (just like you did for the blocks).

Here is the top of my 4-square.


And here is the back.


Now smooth out one backing so that the edge goes under the edge of the next block.

Now fold over the other edge, 1/4" inch.

And lay it down on top of the first edge. Do this along the whole length of one seam. Start with either the vertical seams or horizontal ones, but do all of them before the next.

Pin and sew. You can either whip stitch this by hand or you can sew it by machine. Going right thru the top layer if you use your machine.


When you've done all the horizontal (or vertical) rows, move to the vertical (or horizontal) rows. Lay down one edge flat, fold the other 1/4" under.


Pin and sew.


And here it is, all done...Except for my machine kept acting up and I am going to have to resew both my horizontal and vertical rows. I can't whip stitch them, as it hurts my hands. So I need to fix the tension or something...sigh~ and I just noticed that my seams weren't matching on the two bottom blocks too...

 So it's to the seam ripper I go...and then I can bind it....if I made the machine behave.

Have fun!

Thanks for stopping by

Dorian
Copyright D. Lucas, 2011 This is my tutorial. You are welcome to use any of my tutorials for personal use. You are not permitted to use my pictures or my words without linking back to the original and giving me credit for them.

Tuesday, May 10, 2011

Forum swaps

Sorry it's been awhile, I was offline for almost a week. Computer problems are a pain, but I just can't do without the computer :)

So, I worked on my signature blocks. Last year, in April, the gals on the forum made these blocks. And we traded them, so we all ended up with 22 blocks. We all put our names/city/state on them too.


Over the winter, I made all my signature blocks into these bigger blocks.


And this week, I put them into this square quilt top. It measures roughly 65"x 65".


A lovely day for picture taking.


That was a fun swap. I'm glad to see one more UFO, get closer to finished.

We also have recently done a friendship swap, secret of course! We made these cute little bags, and put some thread and other goodies into them. This is the one I received from Debbie.


Isn't it cute!
We also have another mugrug swap going on. I have mine made, need to get it put in the mail.

What kind of swaps do you like to do?

I have another tutorial coming up, later this week, or maybe next. Depends on how quickly I can get it done. So stay tuned.

Thanks for stopping by.

Dorian