Monday, January 31, 2011

Half square triangles...


Or HST's are they are frequently called. There are many ways of making them. And us quilters are always trying to find a fast, reliable way to make them so they come out accurate. As we all know, triangles are a bit stretchy due to the bias cut. And that can make them a little tricky.

I am a self-taught quilter. I learned from books from the library. I am always learning something new too. And every day we have new quilters out there, so if my little tutorials help them, then I'm happy.

So for those of you who are new to quilting, or those who just need a few tips to help your piecing. He's two quick, easy ways of doing HST's.

This first way is great if you don't have a lot of them to make. Of if you have a lot of squares, and you want to cut them into triangles quickly.

First, take two squares that are 1 1/2" larger than the HST that you want. Place them right sides together. Then sew a 1/4" seam all the way around.


Then you want to cut on BOTH diagonals.


Ta-da...4 perfect HST's.....after you trim them :)


This next way is my favorite way. I don't know if it's because I learned how to do it first, or what.

Take 2 WOF(width of fabric) strips, the width being 1/2" larger than what you want your HST's to be. On the wrong side of the lighter fabric, mark vertical lines to make squares. So if your strip is 3 1/2" wide, then mark every 3 1/2" down your strip.


Then mark a zig-zag line from corner to corner of your squares. And sew 1/4" on BOTH sides of the diagonal line.

Here's a close up.


Now cut on all solid lines.


Ta-da...perfect HST's...again, after you trim them...


I hope this was helpful to some of you.

Have a great day. And come see us on the forum.

Dorian
Copyright D. Lucas, 2011 This is my tutorial. You are welcome to use any of my tutorials for personal use. You are not permitted to use my pictures or my words without linking back to the original and giving me credit for them.

Sunday, January 23, 2011

Our next guest...


...Is Gerda. Gerda is a lovely Canadian gal. She came up with a cute sewing mat, to stick under your sewing machine. And has shared her pattern with us.

" I was in my local quilt shop one day, and the ownder had just gotten in a bolt of the fabric I used. I saw it, and knew I had to have some. I had seen a couple of sewing mats on blogs, and knew I could figure out how to make one for myself. I'm always looking for my scissors/snips and seam ripper, and knew this would help a lot. It was pretty easy to figure out and make. The quilt shop owner really liked it and asked if I would write up a pattern she could use to sell the fabric, so I did. And then I wanted to gift my online friends with the pattern, so I did! LOL" Gerda said.

And then she posted her fun little mat tutorial on our forum too, as a Christmas gift to us all.


SEWING MACHINE MAT WITH POCKETS

Materials needed: .5 m main fabric
.5 m backing/pocket lining
17 ½” x 19 ½” piece of thin batting
* 3 ½” x 15” non-slip fabric (optional)

Cutting: Of the main fabric, cut one (1) piece 17 ½” x 19 ½” AND one (1) piece 4 ½” x 19 ½”

Of the contrast/backing fabric, cut one (1) piece 17 ½” x 19 ½” AND one (1) piece 5 ½” x 19 ½”

IF USING NON-SLIP BACKING: Cut (1) piece 11 ¾” x 19 ½” And one (1) piece 3” x 19 ½ ”

AND two (2) pieces 3” x 3 ½” (backing)

Sewing:

1. *Piece the back – Sew the 3” x 3 1/2” pieces to the short ends of the non-slip fabric .

2. If NOT using non-slip backing, use the 17 ½” x 19 ½” piece.

3. To piece the backing, including the non-slip back- sew the pieced strip to the 3”x19 ½” strip, then add the 11 ¾” x 19 ½” piece to the bottom of the pieced strip.

4. Layer the main fabric right side up on the batting. Quilt as desired.

5. Piece the pocket section – Along one long edge, sew the narrower piece to the wider backing fabric/contrast piece. Press seam to one side, then with wrong sides together, align long edges and press. You will now have the main fabric with a narrow trim on the top (fold).

6. Pin the pocket section on the main fabric, at the bottom. Pin the backing WRONG side up onto the front (main) fabric. Sew ¼” seam all around, leaving an opening of about 5” to turn.

7. Turn right sides out, make the corners as pointy as possible. Slip stitch the opening closed.

8. Finger press (or iron, making sure you don’t touch the non-slip fabric, if used) the edges to a knife edge. Pin and topstitch all around.

9. Decide if you want 3 or 4 pockets. Stitch through all thicknesses of the pocket section ONLY, making sure to backstitch or lock beginning/ends of stitched lines in place. DONE!

2009 Gerda W. Vantuil,


Thank you Gerda for a great sewing mat!!

************

We have our Valentines swap under way, over on the forum. Everyone who wanted to play lists their 2 favorite colors and a fun notion/sewing gadget they want. Whether it be thread, a new cutter, etc.

Then their names goes into a hat and Cupid draws names. We don't know who are Valentine is, till we get our gift in the mail. It's lots of fun!

We have some fabric swaps going on too. And notes are being passed back and forth as to when we'll be doing another 'ugly' contest. Or if maybe we should do a 'this is too pretty to cut' contest.

Come on over and check out the fun!

Have a great, quilt-y day...

Till next time
Dorian

Wednesday, January 12, 2011

Library bag tutorial


Hello out there. Here is my bag tutorial, as promised. Please go easy on me, this is my first tutorial...I hope all my math is correct :) Please feel free to leave me a comment if you are having problems or have questions and I'll do my best to help.

You can click on the pictures to see them bigger.

Ok, here we goooooo....

I have used 3 different fabrics. But you can use 1, 2, 3 or even 4. You'll need pieces for the front, back, 2 sides, bottom and the same for a lining. I did my lining all in the same color.

Fabric 1

Cut one 9 1/2" x 15" piece
Cut one 6 1/2" square piece
Cut one 3 1/2" x 6 1/2" piece
Cut two 5" x 9 1/2" pieces
Cut two 6" square pieces

Fabric 2

Cut two 15" x 15" pieces-lining pieces
Cut four 10" x 15" pieces-3 for lining, 1 for outside bottom
Cut two 6 1/2" x 15" pieces

Fabric 3

Cut two 10" x 15" pieces

Cut two 4" x 43" pieces for the strap, of whichever color you want. I used Color 2.

One 6" zipper

Here is mine. The fabric on the left is Fabric 2, then 3, then 1.

STEP 1 - STRAPS

Take your 4" x 43" strap pieces and fold them lengthwise, press, and open. Then fold in the two long sides, so they meet in the middle,and press.

Fold in half lengthwise and sew along the open side. Then sew on the other side too. (sorry for the fuzzy picture)


STEP 2 - RECESSED POCKET

Your pocket pieces are Fabric 1-two 6" squares, the 6 1/2" square and the 3 1/2"x 6 1/2" piece.

Lay one 6" pocket piece face up, put the zipper edge along the pocket edge, right side up. And then lay your 3 1/2"x6 1/2" piece on top of the zipper, right side down. Pin.
Using your zipper foot, sew a 1/4" seam.


Fold the 3 1/2"x 6 1/2" piece open, and top stitch along the seam.


Now do the same thing on the other side of the zipper, using the 6"square on the bottom, and the 6 1/2" square on the top.


Open and top stitch that seam also.

Now take both your outside pieces (the 3 1/2"x 6 1/2" and the 6 1/2" square) and fold them over to the left. Leaving your zipper laying flat, and your two 6" square pieces laying to the right.


One of your 6" square pieces will be a little shorter now, than the other, due to the zipper lying flat. Trim that piece to match the other and sew around all three sides of it, from zipper to zipper, pivoting at the corners.


Fold the 6 1/2" piece down over the pocket, so that you can see the zipper and 3 1/2" piece. Press.

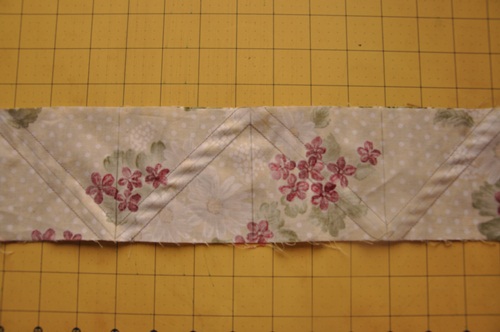
Take your two 5" x 9 1/2" pieces and sew them to either side of your zip pocket, going right over your zipper teeth. You may have to lift the presser foot up to do this. Press.


Step 3 - FRONT AND BACK

Place one strap right along these two side seams (both sides of zipper), hanging 1" over the bottom of the bag, and looping at the top, pin in place.
Lay a Fabric 2- 9 1/2" x 15" piece along the bottom, right side down. Pin and sew a 1/4" seam.

Take your other strap, measure 3 1/2" in on your Fabric 1- 9 1/2"x 15" back piece. On both sides, pin your straps in the same way as the front, and pin on the other Fabric 2 - 6 1/2" x 15" piece. Sew, then press open.

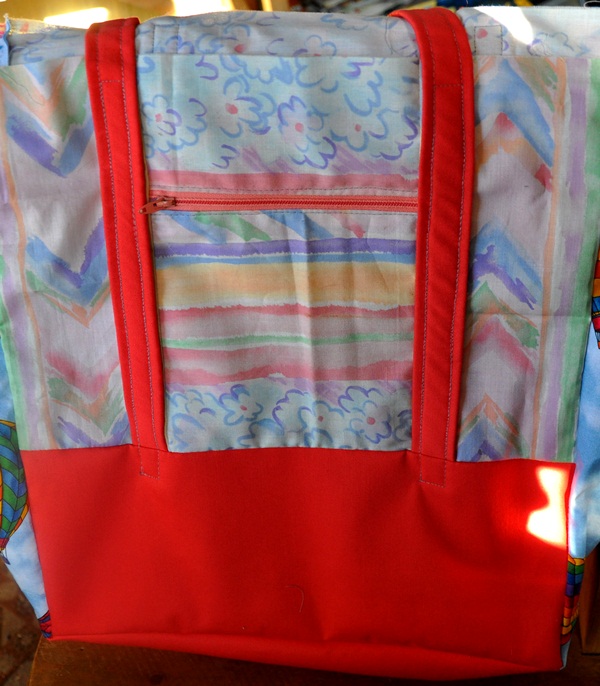
Starting at the bottom of one strap, sew up the length of it, toward the loop. Stop 3/4" from the top of the bag. Pivot and sew, pivot and sew down the length, pivot and sew to where you first started. (I sewed right on the seams of the handles.)Do this to all four pieces of straps.

STEP 4 - SIDES

Using your 10" x 15" fabrics, sew your side fabric piece to a bottom fabric piece, on the 10" sides. Then add another side piece. I used fabric 3 for my sides, and fabric 2 for the bottom.


Do this with your lining pieces too.

Lay the front of your bag right side up. Place the side panel right side down, pin and sew a 1/4" seam (you can use a 1/2" seam for more strength if you want.) Stopping at your 1/4" seam line (the seam that sews your side to the bottom). Back stitching at start and ending.

Now line your bottom piece up with the bottom of the bag front. You'll have to make sure the side panel is out of the way.


Pin and sew a 1/4" seam, making sure to back stitch, and stop at the next 1/4" seam.
Pin the next side panel to the side of the bag, keeping the bottom piece out of the way. Pin and sew.

When you are done, it should look like this.


Now sew the back onto the side and bottom pieces in the same way. You will end up with a 'box', like this (after turning right side out). Turn right side out.

STEP 5 - LINING

Sew your side/bottom/side to one piece of your 15" lining square.
Then sew the next 15" lining square to it, in the same manner you did the outside bag. You'll end up with another 'box' the same size as your outside bag. DO NOT turn your lining bag right side out!

Fold down the top edge 1/2" on both the lining bag and the front bag. Sew all the way around. Making sure to keep the straps out of the way. Here's how mine looks like sewing.


Place your lining bag inside the outer bag, matching up side seams. Pin and sew all the way around, again, watching out for those straps.

Now wasn't that easy?

I would love to see pictures of any bags you make. These are made heafty by using a strong weave cloth, like broadcloth, for the lining and outside bottom and straps.

And easy to make any size!

********************
I just found Fabric Tuesday, on The Quilt story blog, and thought I'd link my bag up on it. Wow, a lot of firsts for me this week :)

It looks like Quilt Story has a bunch of fun things going on. I am thinking of doing their block party next month too! Go check it out, looks like a lot of fun.

Hope you enjoyed my tutorial. Till next time....

Dorian
Copyright D. Lucas, 2011 This is my tutorial. You are welcome to use any of my tutorials for personal use. You are not permitted to use my pictures or my words without linking back to the original and giving me credit for them.

Sunday, January 9, 2011

Thrift store finds

A belated Happy New Year to you all. I hope the year has started off well for everyone. Did you have a good Christmas? I got a nice, new cutting mat! Which I desperately needed :)

A week or so before Christmas, my dh and I were visiting our local thrift store. I am always finding great sewing things there. Usually it's machines, I've brought home two from this thrift store.

But this time, we found a cutter. It works great for cutting strips up, and doesn't hurt my hand to use it.


You lift up the cutting bar, place your fabric where needed (it has a few rulers on the base, those red strips), put your hand on that little deely-bob sticking up and push forward with it. That has the rotory cutter under it.


It's as easy as that. The part that takes the longest is setting it up to the right length.

Then a few days ago, we were in another, newer thrift store. They had some fabric! Most of it was clothing fabric though. Not anything I would use in my quilts. But they had this one bolt of broadcloth, I think that's what it is (I am not that great at what fabric is, unless it's cotton, lol). This cloth is cool because it already has interfacing ironed on it!! The WHOLE bolt was like that! I thought, wow, that will make great bags!


Isn't it a beautiful coral color!! And, it's 60" wide! I got the last 3 yards on the bolt...for only $1.50 a yrd!!

So I took it out yesterday and got right to work. I wanted a new library bag. The one I have is a great canvas one. It's big too, but I wanted something else. And I new that this fabric would be sturdy enough for one. My family of 5 are voracious readers, so a big book bag is in order.

Here is what the front looks like, this is just the shell, without the lining.


Do you see the zipper? It is a recessed pocket for your library card, keys, whatever. My first time doing one! I think it turned out great.

Keep one eye on the blog, I'll be doing my FIRST tutorial, making this bag!

******

On the forum news, we've started our Robin for this year. This time it's a Row Robin, our first one we have done on the forum. Here is my row.


It is a Jacobs Ladder variation. This picture only shows part of it, it's actually 36" long. We wanted to make wall hangings, so they will be a bit taller than wide, but not by much.

****

Well that's all for today. I hope you come back and cheer me on when I post my first tute! I'm a bit nervous.

Till next time....

Dorian