Wednesday, April 27, 2011

A 'charming' table runner

I thought I'd show you another quilt-as-you-go table runner. These are very popular, as they are a quick, easy project. Easily done in a day...unless you have a lot of other obligations :)

This is the same pattern I used for my Spring table runner for my friend Carol.


 Lots of patterns are easy to do in this manner. Just piece together the smaller parts, till you have rows, then quilt as you piece the rows onto the backing/batting.

I used a charm package of Fandango. This pattern uses all but 10 squares. I didn't want it any longer/bigger. And I *was* going to put the extra blocks on the back, in a pieced backing...and I forgot!

You will need:

1 charm pack or thirty-two 5" squares
17"x36" backing and batting
binding


The first thing to do is figure out your layout, what colors you want to make into HST's and where you want them. I drew a chart.


Here is what I used (the colors refer to the background of the prints):

2 brown blocks
2 yellow blocks
8 red blocks
8 white blocks
12 green blocks

To make the HST's. Match two squares, right sides together. Draw a line diagonally from one corner to another. And sew 1/4" on BOTH sides of it.


You will need to match:

2 brown squares to 2 green squares = 4 B/G HST's
2 yellow squares to 2 green squares = 4 Y/G HST's
4 red squares to 4 green squares = 8 R/G HST's
4 white squares to 4 green squares = 8 W/G HST's

Leave 4 red and 4 white squares whole for the center.

Chain piece your HST's


Cut apart on the diagonal line you drew. And trim your squares to 4.5" (you will have to trim your 4 red and 4 white squares to 4.5" also).


Lay out all your squares so they match your drawing of where you want them placed. Watching the HST's, so that they are how you want them. My green makes a nice little zig zag around the inner blocks.


Then you want to sew each piece of a row together. Starting at the left is row 1, then towards 8 at the right.
Now you have 8 rows, that look like this. Press your seams down on row 1, up on 2, down on 3, etc.


I laid mine all out like this, then put them in a stack with row 1 on the top. If you have more space, you can leave them laid out how they go, so you don't get them confused when sewing.

Next, take your back fabric and lay it right side down somewhere flat. I choose this fabric. The color is almost the same reddish-orangey in the Fandango line. And it also already has stabilizer ironed on it. So I didn't have to mess with any batting.

Lay your batting on top of your backing, smoothing them both out. If you use spray adhesive stuff, now would be a good time to use it, I think (I've never used it myself).

Lay row one face UP on your backing. The backing size is slightly larger than the table runner will be. So you don't have to line it up with the left side edge. You can leave a little bit of room for movement. Smooth it down, so there is no puckers or anything.


Lay row two face DOWN on top of row one.  The seams should be opposite, so they snuggle together. PIN (I had to use more pins than is shown, as these HST's are a bit stretchy).


Now sew your seam, you'll be sewing right onto the backing/batting, so make sure your bottom thread is the color you want to show on the back.

Open up row two and smooth it out.


 Lay row 3 on row 2, face down. Smoothing and pinning. Then sew it on.


Continue until you've sewn on all 8 rows.  Making sure each row is smooth and lump free, before adding the next one.

Now trim and put your binding on!


And you're all done!

The back is just 6 rows of stitching.


I hope you've enjoyed my little table runner. Would love to see one, if you make it. Just drop me a line in the comment section.

Thanks for stopping by.

Dorian
Copyright D. Lucas, 2011 This is my tutorial. You are welcome to use any of my tutorials for personal use. You are not permitted to use my pictures or my words without linking back to the original and giving me credit for them.


Sunday, April 24, 2011

Happy Easter

From all of us at the Q&N....

Wishing you a blessed Easter....


Full of love...


And lots of chocolate!


Thanks for stopping by,

Dorian

Sunday, April 17, 2011

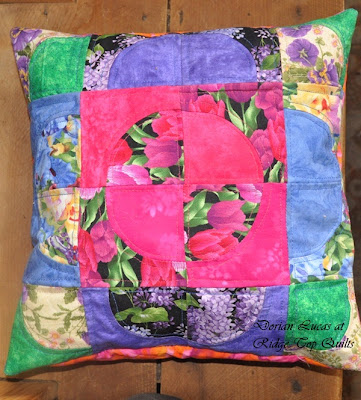
My Pillow

Just a quick post to show you my pillow.


I am not much of a pillow  maker. Haven't made one in years. Didn't have a pillow form, so made one..


It wasn't big enough, so my pillow is a little floppy. LOL


At least I'm doing well with my quilting ;)

Thanks for stopping by!

Dorian

Wednesday, April 13, 2011

Curved seams

I taught myself how to quilt by reading books gotten from the library, and from old issues of Quilters Newsletter I would find at quilt shows. There was no internet then, no blogs to surf, or google to search with.

So when I learned a new technique, I was never intimidated by it. I never read or heard that others were intimidated by it or that people had a hard time with it.

Curves are simple, albeit frustrating at times. The key is to use lots of pins, and go slowly.

I started out with some colorful squares. (Please forgive the fuzzy pictures, not sure why the camera is doing that on some.)


Cut out my concave (top) and convex (bottom) pieces.


Fold in half and finger press. This will give you the middle of each piece, so you can line them up. No markers to fuss with and the line easily comes out.


Rights sides together, match middle lines and pin.


Then start pinning to the left, or right, about every half inch. Gently pulling the concave piece to fit the lines of the convex piece. Making sure there is no small ruffles.


Here is the other side. This is the side that I like to have face up when sewing. That way you can ease around the big ruffles.


Sometimes it's helpful to cut tiny, itty bitty notches in both pieces of the curve. Helps to ease the two pieces together. You notice that the notches are less than 1/4".


Now put your pieces under the needle and slowly go along the edge, pulling pins as you get to them, and gently easing the the pieces together.

If you get to a ruffle that wont move, you can manipulate the fabric just a bit, to make it smooth again. Taking a pin out and adjusting it as needed.

Here it is, all trimmed and ready for the iron. You will notice the fold lines match perfectly.


I always press the seam up, they sit easier that way.


I am quilting this and making  a pillow out of it...notice the top left piece. It has some tiny ruffles there, but those are easily taken out with the iron...apparently I didn't iron well enough ;) .....


I'll show you when it's done.

I hope that I've helped take the intimidation out of curves for you. Feel free to leave comments or questions.

Thanks for stopping by,

Till next time....

Dorian
Copyright D. Lucas, 2011 This is my tutorial. You are welcome to use any of my tutorials for personal use. You are not permitted to use my pictures or my words without linking back to the original and giving me credit for them.

Tuesday, April 5, 2011

Bindings

LOL, going from "lesson 1" to bindings...that was a quick trip, huh?  ; )

As I am just learning, there aren't any more lessons right now. I'll leave that to the pros. But I did want to talk about binding.

There are many reasons that people don't want to hand stitch the back of the binding down. Some people have hand/nerve problems, some people don't want to take the time, and some people just HATE doing it.

I fall in the first catagory, so I've needed to figure out how to machine bind my quilted stuff. I was surfing some blogs and came across a great tutorial at redpepperquilts.  Thank you Rita!

So I want to hit on a few key points here.

This is how you DON'T want it to look. I used to sew from the BACK, but now I know, you sew from the FRONT.


See where the arrows are pointing...your sewing line isn't straight, unless your binding is perfectly straight. Sometimes I would even sew off the binding it's self...not pretty.

So you want to make sure you sew from the FRONT, after pinning.

After you stitch the binding down on the top, bring it around to the back and pin, just covering the sew line from sewing on the front. This is important, to make sure you cover your stitches. This is what happens when you don't....


Point 2, make sure you stitch in the ditch...and I mean RIGHT in the ditch...


'Cause if you don't....see where my off-white stitching is just a SMIDGE outside the ditch....


Then this also happens..


So if that happens to you, you can either resew from the front with your machine. Or you can just whip stitch that little bit down by hand.

There is my 'lesson' on machine piecing bindings. They really are soooooo easy this way.

Now you can put those bindings on much quicker...for those times when you are in a hurry.

Thanks for stopping by....Till next time....

Dorian
Copyright D. Lucas, 2011 This is my tutorial. You are welcome to use any of my tutorials for personal use. You are not permitted to use my pictures or my words without linking back to the original and giving me credit for them.