I've finished my topper, although I made the large outer border with some applique in mind. I think it just 'screams' for some applique or embroidery. But I am not up to it right now.
For your backing and batting, cut a square that extends about an inch beyond the sides, and center your block on it. Smoothing and pinning as normal (sorry, forgot to take a picture). Quilt and trim.
Do you see my mistake? That fold there . It's from not mitering that corner (the one with the pin in it) at the right angle. I was off a smidge. And didn't realize it till it was quilted. No, I am NOT going to take it out. LOL, I thought about it, but decided that since this was just for me, I will leave it.
Start in the middle of one straight side. When you get to the corner, take a back stitch and snip your thread. You noticed I stopped right at the corner, not 1/4" away from it.
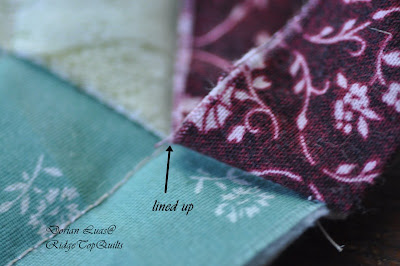
Fold your binding back on itself, matching the fold along the seam.
Hold that fold, and unfold the rest the binding and fit it to the next side. Using a pin to keep that fold in place.
Sew that side, stop at corner, repeat all the way around. Sewing the ends together as you normally would.
Turn your piece over. Fold the binding down, making sure you go OVER the seam line. Put a pin on either side of a corner.
Fold the corner, tucking under the right side, and folding the left over it. Making a nice corner seam. Pin.
After it's all pinned on, sew it down. Either by hand or machine.
Here is my front and back, yes, I machine sew the back of my binding down. You can read how I do it here.
Close up of my quilting. I'm getting good at straight lines...practice, practice! :)
And my finished topper.
Have a great day!
Thanks for stopping by,
Dorian


No comments:
Post a Comment