Monday, May 16, 2011

Quilt as you go....quilt

So we've given you a few great quilt-as-you-go table runners and place mats. But what about if you want to quilt a small to large quilt, in this manner? How do you do that?

When I first learned to quilt, about 17 yrs ago now, I read all the books I could get my hands on. And some of them were books by Georgia Bonesteel. Who taught me how to quilt-as-you-go....something that I have done very little of. LOL

But anyways, here is the gist of it. It's easy and a GREAT project for practicing machine quilting (which I need a lot of!)

First thing to do is make your blocks. All of them. I made 4, just to show you the technique. Cut out squares from your backing material that is just a bit larger than your blocks, maybe an inch (which I failed to do, so things were tight later on). Cut your batting pieces about 1/2" smaller than your blocks. So you will have squares of backing and batting, enough for as many blocks as you make.

Layer them in the normal way, and pin.


Then quilt each of your blocks individually. And trim your backing to the size of the front.


Now take two blocks, put them right sides together. Pin the backing fabric away from the edge where you are going to sew. 

Now pin the edge of the top pieces together, and sew a 1/4" seam.
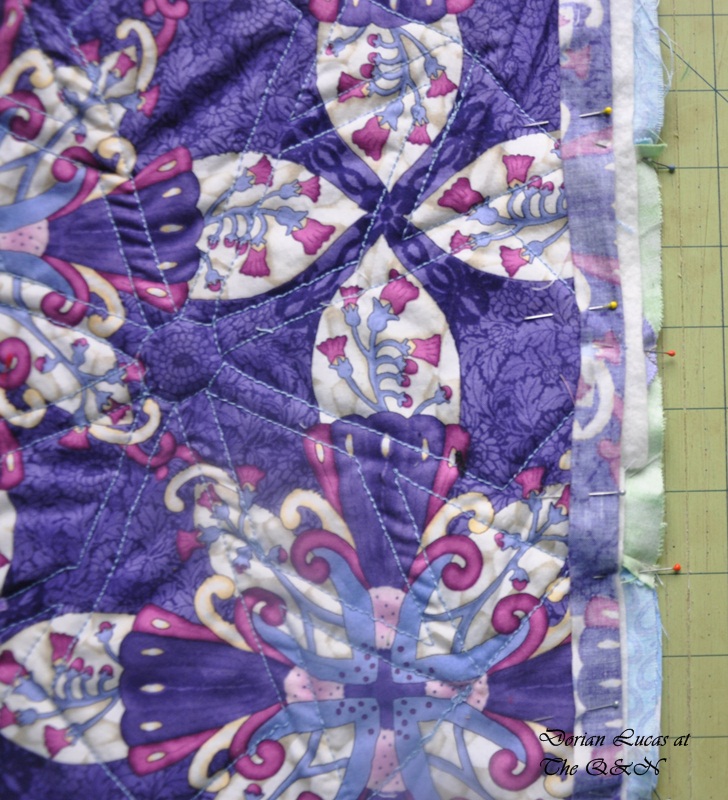

Here is the front and back.


Keep adding blocks to make the rows as long as you need them.
Then take one row, and lay if face up and another row and lay it face down on top. Pin your backing out of the way, match your seams up, and pin and sew top of the rows together (just like you did for the blocks).

Here is the top of my 4-square.


And here is the back.


Now smooth out one backing so that the edge goes under the edge of the next block.

Now fold over the other edge, 1/4" inch.

And lay it down on top of the first edge. Do this along the whole length of one seam. Start with either the vertical seams or horizontal ones, but do all of them before the next.

Pin and sew. You can either whip stitch this by hand or you can sew it by machine. Going right thru the top layer if you use your machine.


When you've done all the horizontal (or vertical) rows, move to the vertical (or horizontal) rows. Lay down one edge flat, fold the other 1/4" under.


Pin and sew.


And here it is, all done...Except for my machine kept acting up and I am going to have to resew both my horizontal and vertical rows. I can't whip stitch them, as it hurts my hands. So I need to fix the tension or something...sigh~ and I just noticed that my seams weren't matching on the two bottom blocks too...

 So it's to the seam ripper I go...and then I can bind it....if I made the machine behave.

Have fun!

Thanks for stopping by

Dorian
Copyright D. Lucas, 2011 This is my tutorial. You are welcome to use any of my tutorials for personal use. You are not permitted to use my pictures or my words without linking back to the original and giving me credit for them.

Tuesday, May 10, 2011

Forum swaps

Sorry it's been awhile, I was offline for almost a week. Computer problems are a pain, but I just can't do without the computer :)

So, I worked on my signature blocks. Last year, in April, the gals on the forum made these blocks. And we traded them, so we all ended up with 22 blocks. We all put our names/city/state on them too.


Over the winter, I made all my signature blocks into these bigger blocks.


And this week, I put them into this square quilt top. It measures roughly 65"x 65".


A lovely day for picture taking.


That was a fun swap. I'm glad to see one more UFO, get closer to finished.

We also have recently done a friendship swap, secret of course! We made these cute little bags, and put some thread and other goodies into them. This is the one I received from Debbie.


Isn't it cute!
We also have another mugrug swap going on. I have mine made, need to get it put in the mail.

What kind of swaps do you like to do?

I have another tutorial coming up, later this week, or maybe next. Depends on how quickly I can get it done. So stay tuned.

Thanks for stopping by.

Dorian

Wednesday, April 27, 2011

A 'charming' table runner

I thought I'd show you another quilt-as-you-go table runner. These are very popular, as they are a quick, easy project. Easily done in a day...unless you have a lot of other obligations :)

This is the same pattern I used for my Spring table runner for my friend Carol.


 Lots of patterns are easy to do in this manner. Just piece together the smaller parts, till you have rows, then quilt as you piece the rows onto the backing/batting.

I used a charm package of Fandango. This pattern uses all but 10 squares. I didn't want it any longer/bigger. And I *was* going to put the extra blocks on the back, in a pieced backing...and I forgot!

You will need:

1 charm pack or thirty-two 5" squares
17"x36" backing and batting
binding


The first thing to do is figure out your layout, what colors you want to make into HST's and where you want them. I drew a chart.


Here is what I used (the colors refer to the background of the prints):

2 brown blocks
2 yellow blocks
8 red blocks
8 white blocks
12 green blocks

To make the HST's. Match two squares, right sides together. Draw a line diagonally from one corner to another. And sew 1/4" on BOTH sides of it.


You will need to match:

2 brown squares to 2 green squares = 4 B/G HST's
2 yellow squares to 2 green squares = 4 Y/G HST's
4 red squares to 4 green squares = 8 R/G HST's
4 white squares to 4 green squares = 8 W/G HST's

Leave 4 red and 4 white squares whole for the center.

Chain piece your HST's


Cut apart on the diagonal line you drew. And trim your squares to 4.5" (you will have to trim your 4 red and 4 white squares to 4.5" also).


Lay out all your squares so they match your drawing of where you want them placed. Watching the HST's, so that they are how you want them. My green makes a nice little zig zag around the inner blocks.


Then you want to sew each piece of a row together. Starting at the left is row 1, then towards 8 at the right.
Now you have 8 rows, that look like this. Press your seams down on row 1, up on 2, down on 3, etc.


I laid mine all out like this, then put them in a stack with row 1 on the top. If you have more space, you can leave them laid out how they go, so you don't get them confused when sewing.

Next, take your back fabric and lay it right side down somewhere flat. I choose this fabric. The color is almost the same reddish-orangey in the Fandango line. And it also already has stabilizer ironed on it. So I didn't have to mess with any batting.

Lay your batting on top of your backing, smoothing them both out. If you use spray adhesive stuff, now would be a good time to use it, I think (I've never used it myself).

Lay row one face UP on your backing. The backing size is slightly larger than the table runner will be. So you don't have to line it up with the left side edge. You can leave a little bit of room for movement. Smooth it down, so there is no puckers or anything.


Lay row two face DOWN on top of row one.  The seams should be opposite, so they snuggle together. PIN (I had to use more pins than is shown, as these HST's are a bit stretchy).


Now sew your seam, you'll be sewing right onto the backing/batting, so make sure your bottom thread is the color you want to show on the back.

Open up row two and smooth it out.


 Lay row 3 on row 2, face down. Smoothing and pinning. Then sew it on.


Continue until you've sewn on all 8 rows.  Making sure each row is smooth and lump free, before adding the next one.

Now trim and put your binding on!


And you're all done!

The back is just 6 rows of stitching.


I hope you've enjoyed my little table runner. Would love to see one, if you make it. Just drop me a line in the comment section.

Thanks for stopping by.

Dorian
Copyright D. Lucas, 2011 This is my tutorial. You are welcome to use any of my tutorials for personal use. You are not permitted to use my pictures or my words without linking back to the original and giving me credit for them.


Sunday, April 24, 2011

Happy Easter

From all of us at the Q&N....

Wishing you a blessed Easter....


Full of love...


And lots of chocolate!


Thanks for stopping by,

Dorian

Sunday, April 17, 2011

My Pillow

Just a quick post to show you my pillow.


I am not much of a pillow  maker. Haven't made one in years. Didn't have a pillow form, so made one..


It wasn't big enough, so my pillow is a little floppy. LOL


At least I'm doing well with my quilting ;)

Thanks for stopping by!

Dorian