Hello Everyone, hope that Spring time is coming to you all soon. I can certainly feel it when I head off my mountain and go into the valley. The allergies are AWFUL down there! I'm soooo glad to be up and out of it.
I thought I'd do a tutorial on mitered corners this morning. I'm sure there are a few different ways to do them, but this is the way I learned, and it's so easy! So, here we go.
Many patterns tell you to cut your borders at least 10" longer than what your quilt top is, when you want mitered corners. Even if you don't need that much, it gives you room so that you have enough. I often don't have extra, or I don't want to cut extra, for this. So I measure real close.
In my example here, my border is 2.25" wide. So when I cut the border fabric, I make sure I added 4.5" (that's 2.25" extra at each end) to how long a side is. This is a table runner, so I had 2 long lenghts, and 2 shorter lengths.
Fold your border piece in half, and mark the middle. Fold your project in half, and mark the middle. Lay your border rights sides together with your project, matching your middle marks, and pin. You can see that I overlap the project by 2.25" on each side.
Pin all along the border and sew at 1/4". Making sure you START and STOP 1/4" away from each side. Taking a few back stitches.
Find the middle of the next side border and that side of the project. Pin together. When you sew this next side on, be sure to START sewing right where your previous border seam is. That will be 1/4" from the project edge, NOT the first border edge
Pin all along and sew. Making sure to STOP at 1/4" from the next edge.
Continue around your project till all four of your borders are on.
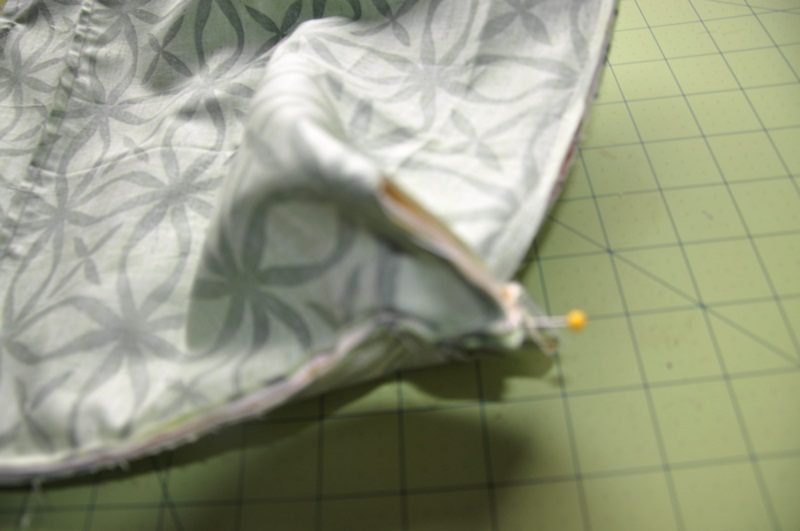
Now, take one corner and fold it over till the top border meets the side border. You want to make a triangle and line the top and side border up.
Here's a close up, sorry it's blurry (it doesn't look blurry on the camera, and I don't realize it is till I put it on the computer).
You want to draw a 45 degree line, from the very corner of your project, to the corner of the border. If you gave yourself more room when cutting the border lengths, then your line wont reach the corner of the border. So make sure you use your 45 degree line on the ruler.
Now you want to pin this, so it doesn't move when you sew. Sew ON the line you just drew. Making sure you start right where your previous seams end at the corner.
Cut off the excess, making sure to leave 1/4" seam.
Fold open, and repeat for all 4 corners.
And now you have beautiful mitered corners.
If you want to do a pieced border this way. When you are measuring and making your border, you need to remember to add in the width of each border, on each side. So in this case, my pieced border would half to be 4.5" longer, and then a corner of it would be cut off when I mitered the corners.
Hope this is helpful to some of you out there. It really is very easy. The important part is making sure you start and stop a 1/4" away from the edges of the project. In order to have the seams match perfectly in the corners. Very much like set in seams :)
Have a great day, and thanks for stopping by.
Till next time,
Dorian
Copyright D. Lucas, 2011 This is my tutorial. You are welcome to use any of my tutorials for personal use. You are not permitted to use my pictures or my words without linking back to the original and giving me credit for them.
Wednesday, March 9, 2011
Saturday, March 5, 2011
It's March already
And those on the forum knows what that means....RETREAT! A quilting retreat for those lucky enough to go. From March 16th to the 21st, in Texas.
It also means a new mystery quilt though, can't wait for that! You can buy your pattern here.
March is going to bring in Spring. And we'll all welcome it with our mug rug swap. A cute swap full of Spring fabrics.
I can't wait for my roses to start blooming and the wild flowers to start popping up. Right now my rose bushes are looking pretty sad. The cold snow we had the past few weeks has broken a lot of the vines. So once our chance of frost is gone, I'll get the snippers out and trim them up.
We also have a thread challenge going on. There are some very pretty projects in that thread.
But after that is over with.....we are going to start a "It's too pretty to cut" challenge!!! WOOOHOOO! This is a fun challenge/contest. In the past, we've done it with fabric that is...well .... just not our style. But what one person thinks of as Ugly, the next doesn't. So that was a lot of fun. In this challenge, we'll cut into a pretty piece of fabric we've been hoarding, one we just haven't been able to cut up. Look for a thread on the forum for that in the next few weeks.
Well that's what's going on around the forum. Hope you can hop over and spend some time with us.
Till next time...
Dorian
It also means a new mystery quilt though, can't wait for that! You can buy your pattern here.
March is going to bring in Spring. And we'll all welcome it with our mug rug swap. A cute swap full of Spring fabrics.
I can't wait for my roses to start blooming and the wild flowers to start popping up. Right now my rose bushes are looking pretty sad. The cold snow we had the past few weeks has broken a lot of the vines. So once our chance of frost is gone, I'll get the snippers out and trim them up.
We also have a thread challenge going on. There are some very pretty projects in that thread.
But after that is over with.....we are going to start a "It's too pretty to cut" challenge!!! WOOOHOOO! This is a fun challenge/contest. In the past, we've done it with fabric that is...well .... just not our style. But what one person thinks of as Ugly, the next doesn't. So that was a lot of fun. In this challenge, we'll cut into a pretty piece of fabric we've been hoarding, one we just haven't been able to cut up. Look for a thread on the forum for that in the next few weeks.
Well that's what's going on around the forum. Hope you can hop over and spend some time with us.
Till next time...
Dorian
Thursday, February 24, 2011
Squaring the bottom of a bag
Squaring the bottom of a handbag or tote is easy to do. Here are two simple ways.
I like this first way, don't know why, they are both easy. But this is the way I tend to do it.
Put your fabrics right sides together. Pin and sew a 1/4" (or 1/2") on both sides and the bottom.
Cut out a square on both bottom corners. For smaller bags I cut a 2" square, for larger ones a 3".
Match the bottom seam to a side seam. Pinching the fabric together and pinning.
Sew a 1/4" seam in from the edge. Do this to both corners.
Turn right side out. And Ta-Da, your square bottom.
The second way to do this. Is super easy. Match your fabrics right sides together, pin and sew both sides and bottom.
But instead of cutting the corners, pinch the corner so that the bottom seam matches the side seam.
Mark a line where you want to sew. I went in only 1" on this bag, as it's only a 5" bag.
Sew and cut a 1/4" away from the seam.
Turn right side out.
You can see more pictures on this on my Library bag tutorial.
Have fun!
Till next time...
Dorian
Copyright D. Lucas, 2011 This is my tutorial. You are welcome to use any of my tutorials for personal use. You are not permitted to use my pictures or my words without linking back to the original and giving me credit for them.
I like this first way, don't know why, they are both easy. But this is the way I tend to do it.
Put your fabrics right sides together. Pin and sew a 1/4" (or 1/2") on both sides and the bottom.
Cut out a square on both bottom corners. For smaller bags I cut a 2" square, for larger ones a 3".
Match the bottom seam to a side seam. Pinching the fabric together and pinning.
Sew a 1/4" seam in from the edge. Do this to both corners.
Turn right side out. And Ta-Da, your square bottom.
The second way to do this. Is super easy. Match your fabrics right sides together, pin and sew both sides and bottom.
But instead of cutting the corners, pinch the corner so that the bottom seam matches the side seam.
Mark a line where you want to sew. I went in only 1" on this bag, as it's only a 5" bag.
Sew and cut a 1/4" away from the seam.
Turn right side out.
You can see more pictures on this on my Library bag tutorial.
Have fun!
Till next time...
Dorian
Copyright D. Lucas, 2011 This is my tutorial. You are welcome to use any of my tutorials for personal use. You are not permitted to use my pictures or my words without linking back to the original and giving me credit for them.
Friday, February 18, 2011
Mug Rugs
The mug rugs are running rampant. LOL. Such cute little bits of fabric, pieced together and quilted so quickly. There are swaps and contests galore out in blog land.
Here is one I did for a contest over at Madame Samms'.
They are so easy to make. And PERFECT for practicing your newfound machine quilting skills (which I obviously need LOTS more work on. LOL)
You can make your own design, with scraps from your scrap basket...I just put some of these together till I had a pleasing design.
Sew together. And trim.
You can also use a block from any pattern out there. Here are a few darling ones. The first one comes from Happy Zombie, I love it!

Here's one from Jennifer, I love the pocket!
Back to mine...
If it's not big enough, no problem, just add a few pieces till it's the right size for you.
Then layer it, quilt it and bind it. Ta-da! super easy.
We are having a mug rug swap at the Q&N! Click here to join us. It's a secret one (we LOVE secret's on the forum!), which means we wont know who is making us a mug rug, till it arrives on the doorstep. Lots of fun.
Hope to see you there!
Till next time....
Dorian
Thursday, February 10, 2011
Prairie Points
I just love Prairie points (or PP from now on) on a quilt. They just put the right finishing touch on it. Especially baby quilts! Or mug rugs! Or even purses. I saw a darling wall hanging of a sailboat, that used PPs as the waves! it was soooo cute!! (Sorry blogger who did it, I have forgotten where I've seen it.)
This one, at the top there, was a Aunty quilt we did on the forum for one of our members' grandchild.
Sandy has asked for a tutorial, and I am more than happy to oblige :) So here we go.
Cut your squares for the PP's the size you want the base of the triangle...the base is the side that is going to be sewn onto the quilt. So if you want a 3 1/2" triangle, then cut 3 1/2" squares. How many triangles you need, depends on how big your triangles are. I divide the finished PP measurement (in this case I use 3") into the length of a side. So for a 30" unfinished top, I would make 10 triangles for that side. Sometimes I use more or less than that number though.
So, here's your square.
Fold it in half diagonally.
Open up the corner where the last fold was made, just a little bit to slip in the next triangle. I like to put it in about a half an inch. Then sew, using a scant 1/4" seam (some people use 1/8"). Stopping about halfway thru the triangle, to put the next one in. (Line the edges up of course, I just stuck the yellow one out to show you.)
Continue on in this manner until all your triangles for ONE side is sewn in a row.
When all your triangles are sewn in a row, it's time to put them on the quilt.
I am not much into pinning and ironing, lol, but this is a time for both.
Iron the backing and top edges down 1/4".
At the corner, put the very tip of your triangle right inside the edge of the opposing side.
You notice that where the two triangles meet, is right at the very edge. You don't want it sticking up further, and you don't want it too far into the sandwhich either.
Sew the sandwhiched triangles, using 1/4" seam. Starting and stopping about 1/2" away from the corner. Taking a few back stitches.
Do the same thing for the next side. Lining up the end triangle with the one that is already sewn on (you want a nice, straight line across that corner point).
When you sew this one down, you can start at your stopping place on the first side, then just pivot at the corner.
Continue till all sides are done.
******
There is another way to fold your triangles, using rectangles. You fold the two top corners down to meet in the middle, at the bottom edge, then fold in half. But squares are easier for me.
Alternatively you can sew all your triangles together in one loooooong line, and then when you pin it on, make sure that you line the triangles up right, so that where two triangles meet, is right at the corner. So it looks this.
*****
I hope that helps Sandy! And anyone else who wants to do this darling finish. If you have any questions, please feel free to leave a comment, and I'll get back to you.
Till next time...
Dorian
Copyright D. Lucas, 2011 This is my tutorial. You are welcome to use any of my tutorials for personal use. You are not permitted to use my pictures or my words without linking back to the original and giving me credit for them.
Subscribe to:
Posts (Atom)