Pages

Saturday, August 27, 2011

quilt as you go...hexagon table runner

Hello everyone, I have finally got my tutorial together for my quilt as you go hexagon table runner. Whew! And I am warning you know, my quilting skills have taken a dive this past week or so :( LOL (so just ignore the quilting)

 I made three more hexagon flowers out of 4" squares. And sewed them together on the sewing machine. Then I turned under the edges 1/4" and sewed it down. (If you prefer to applique, then don't sew the edges under 1/4")


Next I cut three 14" squares. Laid my ruler on the side, 4" in on the bottom, and 7" up the side, and cut.


Turn the ruler and do the other bottom side.


Flip the whole thing, so the top is on the bottom. And cut as above.


Take four 8.5"x  9" rectangles. Lay them so that the 9" go out to the side. Lay your ruler so the edge is at the bottom left corner, and the 30 degree angle on the ruler is along the left edge of fabric. Cut.


Cut at a 30 degree angle from the bottom right corner also.


Take one triangle, lay if right sides together with a side of the hexagon. Making sure the tips of the triangle, go past the edges of the hex a little bit.


Place two triangles on another hexagon, on opposite sides of each other.


And sew the last one on the last hexagon.


Cut backing and batting at 18"x 46". Fold in half both ways, and finger press to find the middle. (you can use a ruler and pencil too, if you want)


Lay hexagon two in the very center and pin it down. (watching where you put the triangles)


Lay hexagon three on the right side, right sides together. Making sure that the tip of the triangle hangs off the edge of the bottom hexagon about 1//4". Pin and sew with a 1/4" seam.


To get those inner seams to meet just right. I fold back the top piece along the 1/4" mark, before I sew, and make sure those two seams are going to intersect on that 1/4" line. Then put a pin in it.


Open it up and place the hexagon one on the left. Right sides together. Pin and sew like before.


Now cut four 1.5"x 11" strips  and two 1.5"x36" ( I already had these strips at 1.5", so didn't want to cut any other ones (yes, being lazy. lol) but you can easily put 2" strips on instead.)

Add the 11" long strips to the ends. Place one, right sides together, making sure they go over the ends of the hexagon. Pin and sew.


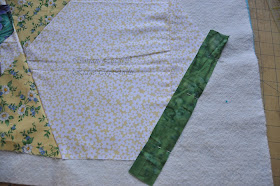
Open it up. You can iron if you want, or just finger press it. Place another on the other side, making sure that the corner goes past the green strip. Pin and sew.


Do the same thing for the other end.


Place your long strip, right sides together, making sure to go over the green end strip. Pin and sew.


Do both long sides.

Place your flowers in the center of the hexagons. Either quilt them down or applique them.


Lay your ruler along the end pieces and cut off extra batting/backing. Doing that all the way around. Cutting your ends first. Then the sides.


Quilt as much or as little as you want.

Add the binding, and your done :)


I hope you've enjoy my little tutorial.

Have a great day!

And thanks for stopping by
Dorian

Thursday, August 25, 2011

08/25/11 Diva Designer Tip

If your tension seems off on your machine, try replacing the needle first. Sometimes a fresh needle can fix the problem.

Piece out,
Jess


- Posted using BlogPress from Jess' iPhone

Tuesday, August 23, 2011

A lazy blogger...

Gosh, sorry it's been awhile since I made a post! What a lazy blogger I am being lately. There is lots going on in my little world, and it's kind of pushed quilting and blogging to the back.

I'm sorry if there is anyone out there waiting for my hexagon quilt as you go table runner. You all are so quiet, I have no idea if anyone is waiting for the tutorial or not :)

But, none the less, I will try to get that done in the next few days for whomever is interested.

I have finished the baby quilt top I am making. I don't want to post a full picture, as my friend wants to be surprised by it, and she reads this blog. But, I can tell you you can go here (scroll down) to see it!

And because I don't like to post without a picture,  here is a little snippet...the monkey 'tail' (wrench) block that I made.


 Don't you just love those polk a dots??!! I do. lol

Have a great day all. Thanks for dropping by!


Tuesday, August 16, 2011

Diva Designer Tip 8/16/11

Use a pants hanger to hold open your pattern book while working on a quilt. You can even hang it on a convenient wall or bulletin board to save space!

Piece out,
Jess


- Posted using BlogPress from Jess' iPhone

Monday, August 15, 2011

Diva Designer Tip 8/15/2011

Always "set" your seam first, by pressing it the way it was sewn before pressing the seam one direction or the other. This sinks the thread into the fabric and reduces the bulk of the seam (which is really nice when quilting!).


- Posted using BlogPress from Jess' iPhone

Thursday, August 11, 2011

What I'm doing...

So Summer is coming to a close....at least, by the school calendar it is. So much of the states are broiling, that it's hard to tell. LOL.

Whether you home school like I do, or your kids are in public or private school. Now is the time everyone is getting ready to get back into the routine. Does that mean less sewing time for you? Or more?

For me, I have to juggle the schooling of the kids. So I actually get less time to sew in the Winter months. But as it's so important to give yourself some "ME" time, I make sure I take some sewing time most days.

I finally got these gorgeous Anne Kellie fabrics, and some solids to go with them. This is going to be a baby quilt for my best friends first Grandchild. I got this fabric from Lola Pink. I highly suggest this fabric store. Fast, curtious service! And great prices.


These are SO CUTE! I can't wait to cut into them. The first block I will be doing is the monkey wrench (I think a better name would be monkey TAIL. LOL)...of course! The nursery is going to be decked out in jungle fun, so a monkey quilt fits the bill.


Now I know, most people will say "what a minute, that is snails trail, not monkey wrench". I saw this block here, and that is what she calls it.

Here is a snails trail block. That I got here.


Can you see the subtle difference?

The snails trail block consists of a 4-patch, with THREE layers of squares after it. Whereas the monkey wrench consists of a 4-patch, with FOUR layers of squares after it. Pretty neat, huh?!

So, I am going with this monkey wrench, not the other monkey wrench pattern out there.

I also have some batting, so am going to be doing my hexagon quilt-as-you-go table runner next week. Has any else done some of these hexagon place mats?


I also have all three of my quilt along blocks done. I'm doing this quilt along over at RidgeTopQuilts. You're welcome to come over and do it too. We'll be putting this blocks together next week.


Not to mention the rows for our row robin swap I'm doing on the forum. And getting ready to quilt my first Aunty quilt.

So it looks like I have plenty to keep me busy....how about you? What are you working on?

Have a great day, thanks for stopping by!

Dorian

Monday, August 8, 2011

Diva Designer Tip

Instead of marking the line to sew on the backs of tons of squares, try using wide sticky notes as a sewing guide. I used the same two sticky notes to sew over 300 seams and saved a chunk of time!


- Posted using BlogPress from Jess' iPhone

A quick note

Hello out there,

Just a quick note to tell you that all our Diva Designer tips our on their own page now. up top, alongside Tutorials and such.

Here's one from me, although I don't know how much of a tip it is...it's probably just common sense, but sometimes...I just don't seem to have any! LOL

When drafting and making your own patterns. Cut out and sew  a sample block from scrap fabric, BEFORE you cut out all the pieces for all the blocks you are going to do! 

Sigh, pattern making is not fun all the time!....

Just most of it. lol

Have a great day,

Thanks for stopping by
Dorian

Sunday, August 7, 2011

Diva Designer Tip

Quilters used to use cooking ingredients like cocoa powder, cinnamon, baking powder, and corn starch to pounce mark their quilts for quilting. In a pinch, out if chalk? You might have something in your pantry that will do! (Be sure to test it on a scrap of fabric first, as you would do with anything you put on a quilt to mark it.)


- Posted using BlogPress from Jess' iPhone

Thursday, August 4, 2011

Diva Designer Tip

When working with fusible appliqué, use parchment paper to protect your ironing board cover and other surfaces from the fusible product you choose to use. (I like Steam-a-seam and sometimes Misty Fuse, and I try to cut out the center of the fusible and only fuse the edges of the pieces for a softer end product.)


- Posted using BlogPress from Jess' iPhone

Wednesday, August 3, 2011

The small clutch, handbag, make-up bag.......

It comes with all kinds of names, depending on what you do with it I suppose :)

Have a few leftover charms from a charm pack? Or some 5" squares that are in the scrap bin?


Here's a cute little bag to make with them.


You will need:

6 charm squares (or 5" squares)
two- 7 1/4"x 12 1/4" rectangles for lining.
four - 2.5" x 12.5" contrasting strips
 a 12" zipper
a 2.5"x 15" strip for a strap
two- 7 1/4" x 12 1/4" rectangles of batting or interfacing.

Fold your strap in half lengthwise, unfold it and fold each long side into the middle. Then fold in half again and sew a seam all the way down the length.

Iron on your interfacing to the lining rectangles, if using.

Take your charm squares (5"squares) and pair them up, right sides together.  Draw a line from one corner to the other.


Sew a 1/4" seam on both sides of the line, on all three squares. Cut apart on the drawn line, making 12 HST blocks.


Trim your HST's to 4.5".

Put three of them in a line, in a pleasing manner. Sew them together. Making two sets of three blocks.


 Add a contrasting 2.5"x12.5" strips along the top and bottom of each set.


Lay one lining piece right sides down, put batting on (if using), then your front piece, right side up. You can put a few pins in to keep everything together.

Put your zipper right side down on top of the front piece and sew on. Open and make a top seam. On top of the zipper, lay your next front piece, right side down. Put on your batting, if using, then the lining piece, right side up. Sew the sandwhich to the zipper. Open and top stitch.


UNZIP your zipper half way. Fold your strap in half, so it makes a loop. Stick the raw ends of it along the side, about an inch down from the top. (Obviously, I forgot to do this before I sewed my bag together!!)


Fold one side over, so both front sides are facing each other. Sew a seam down one side, across the bottom and up the other side. Taking some back stitches at start and stop. I like to use a 3/8" or 1/2" seam on my bags. Gives them a tiny bit extra stength.

Trim your corners.


If you don't like the raw edge on the inside of your bag. You can put a binding on them now. Or instead, you can make a french seam (which you would do instead of this sewing and trimming). Whip Up has a drawstring bag tutorial, showing how to make a french seam.

Turn right side out. Carefully poking out the corners.

Hope you enjoyed my quick, easy tutorial. This is a perfect little bag for a quick trip to the store, a night on the town, or to use as a make-up bag.

Have fun! And feel free to email/comment if you have any questions.

Thanks for stopping by!

Dorian

Monday, August 1, 2011

Diva Designer Tip 8/1/11

When cutting triangles, patterns may have you cut some squares once diagonally and some squares on both diagonals. Do you know why? It depends on where the triangle is going to land in the project; the designer is trying to make the straight of grain land on the outside of the block or quilt top.


- Posted using BlogPress from Jess' iPhone